New to Suga platforms? See the Platforms Overview to understand how platforms work and why they’re useful. Don’t want to manage platforms? Use Suga’s default platforms and jump to the Quickstart.
Phase 1: Build Serverless Platform
Understanding the Architecture
This architecture shows a CloudFront distribution routing requests to a Lambda function, which accesses an S3 bucket and a Neon database.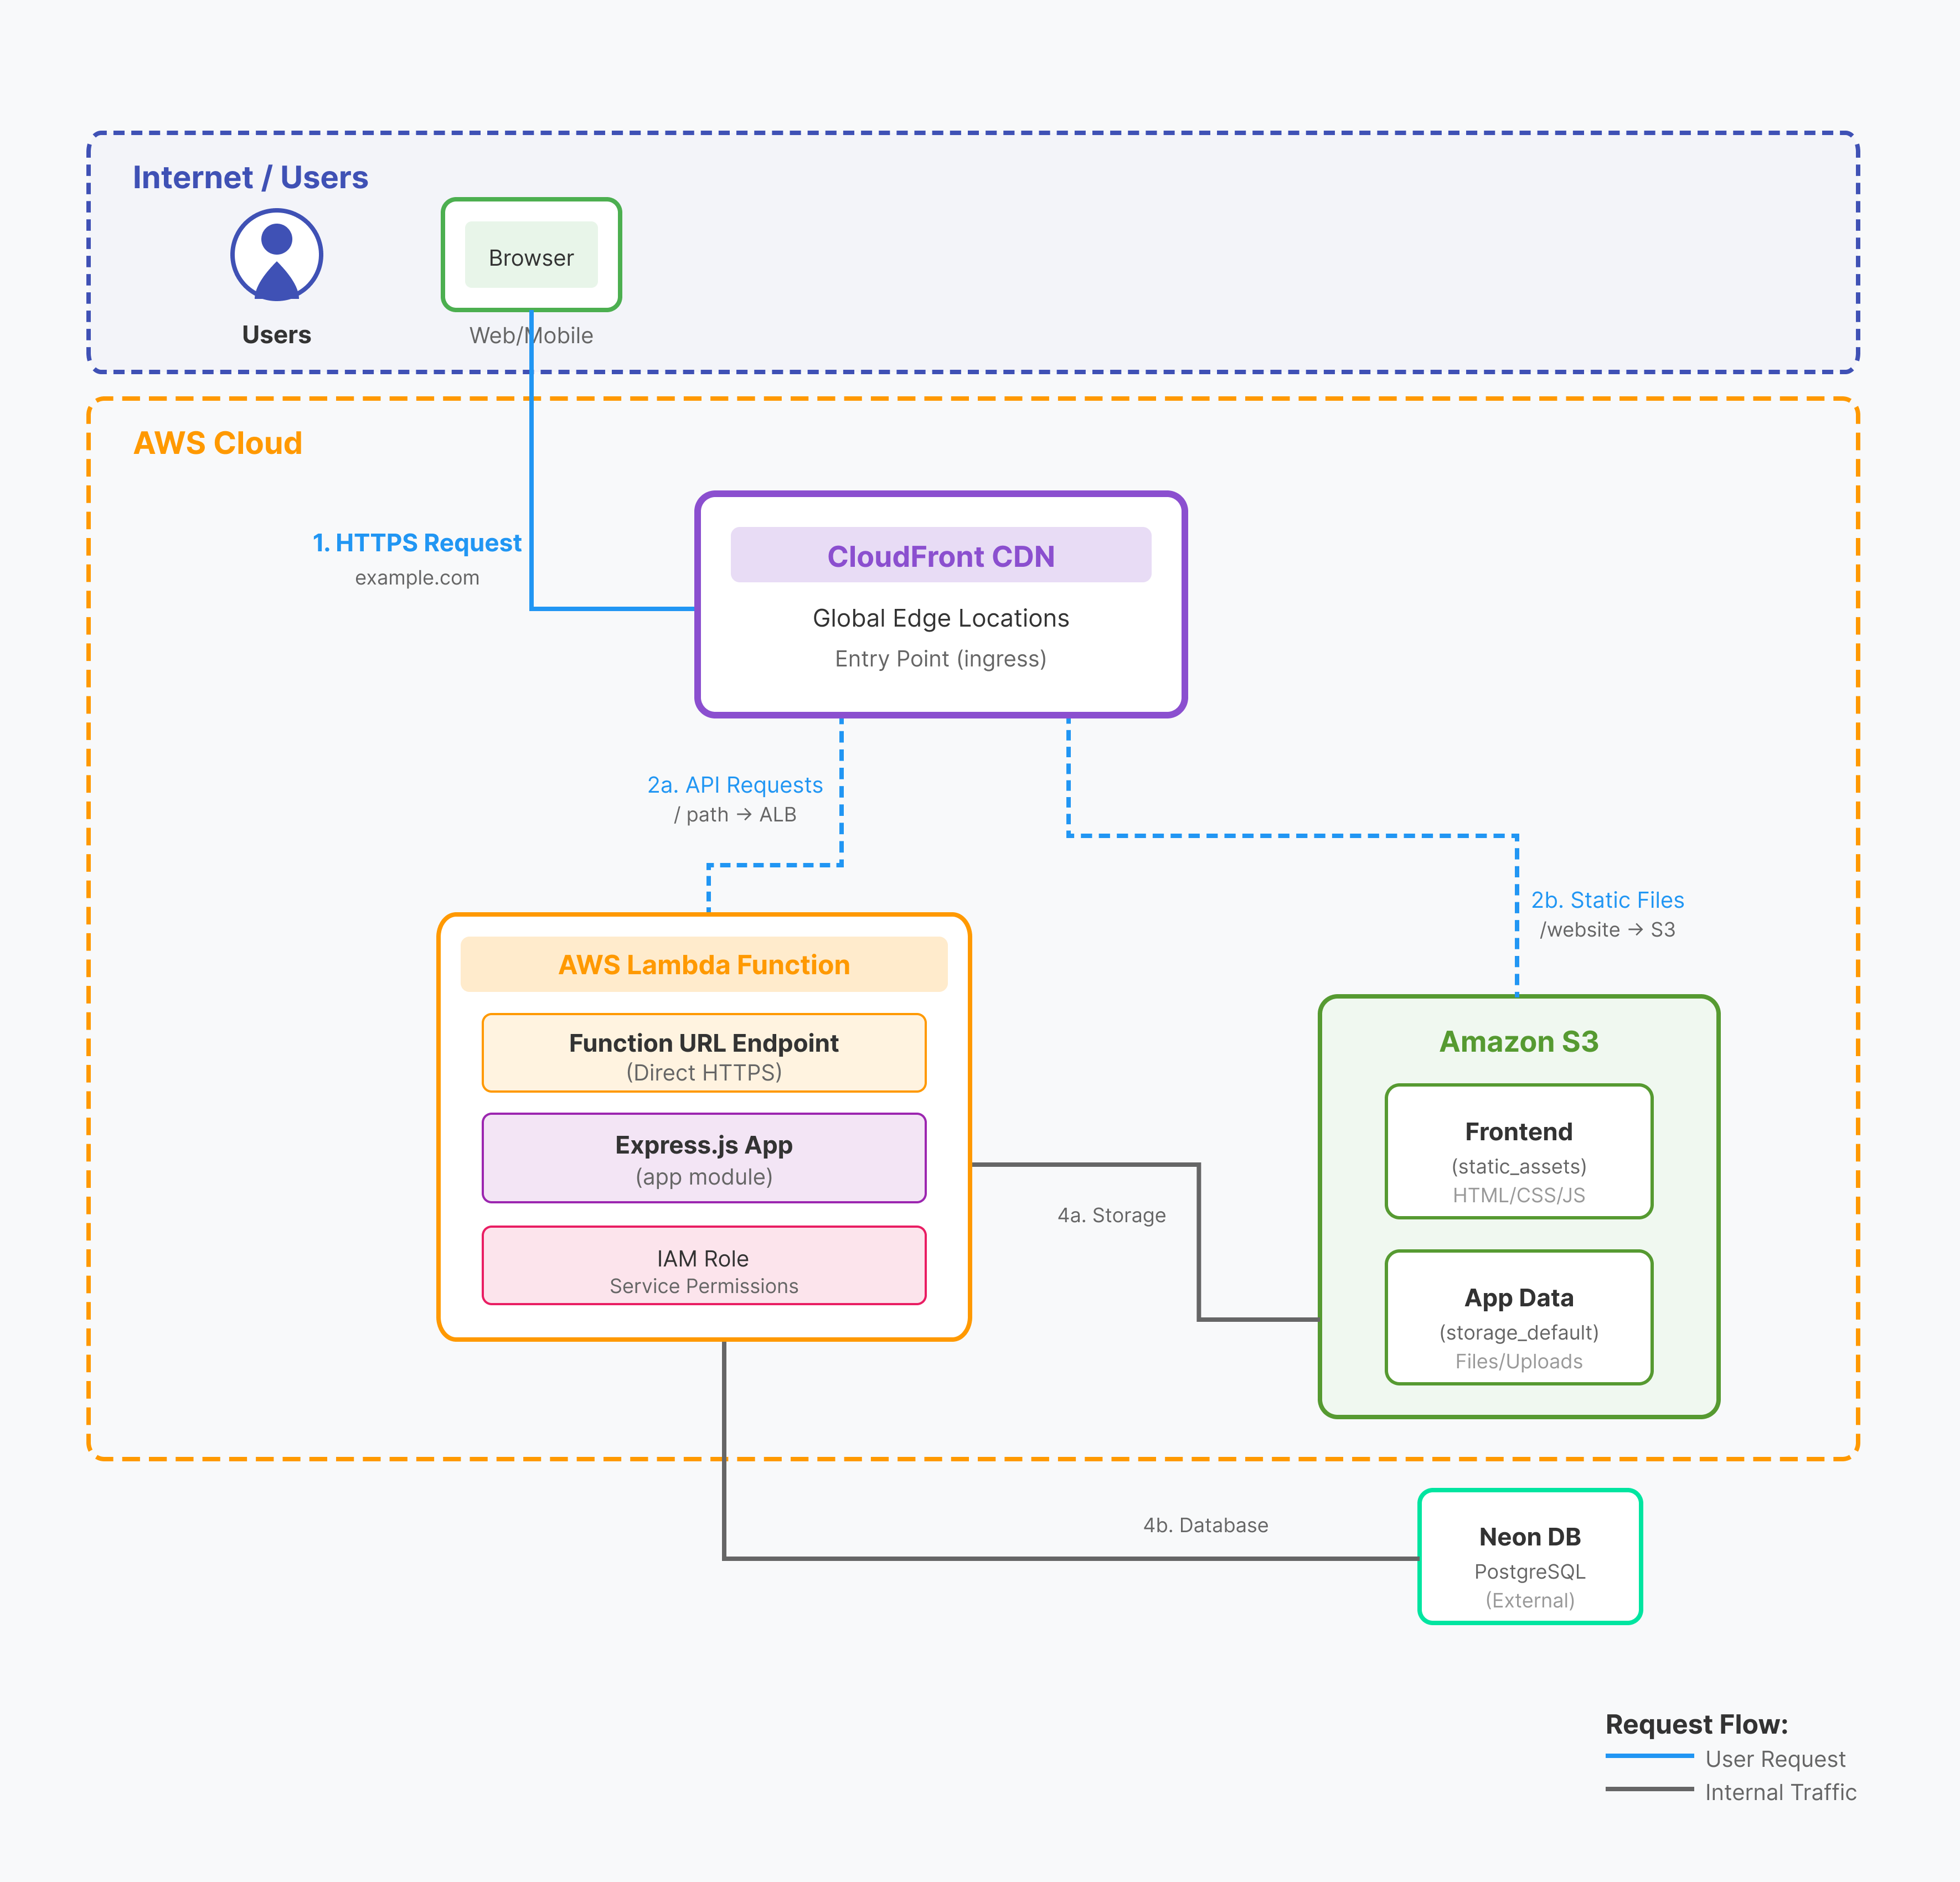
- Entrypoint - CloudFront CDN for routing requests
- Service - Lambda functions with IAM role for running code and accessing resources
- Bucket - S3 for file storage
- Database - Neon PostgreSQL
Create New Platform
Sign in to the Suga platform editor at https://app.addsuga.com, select your team, then click “Create New Platform”.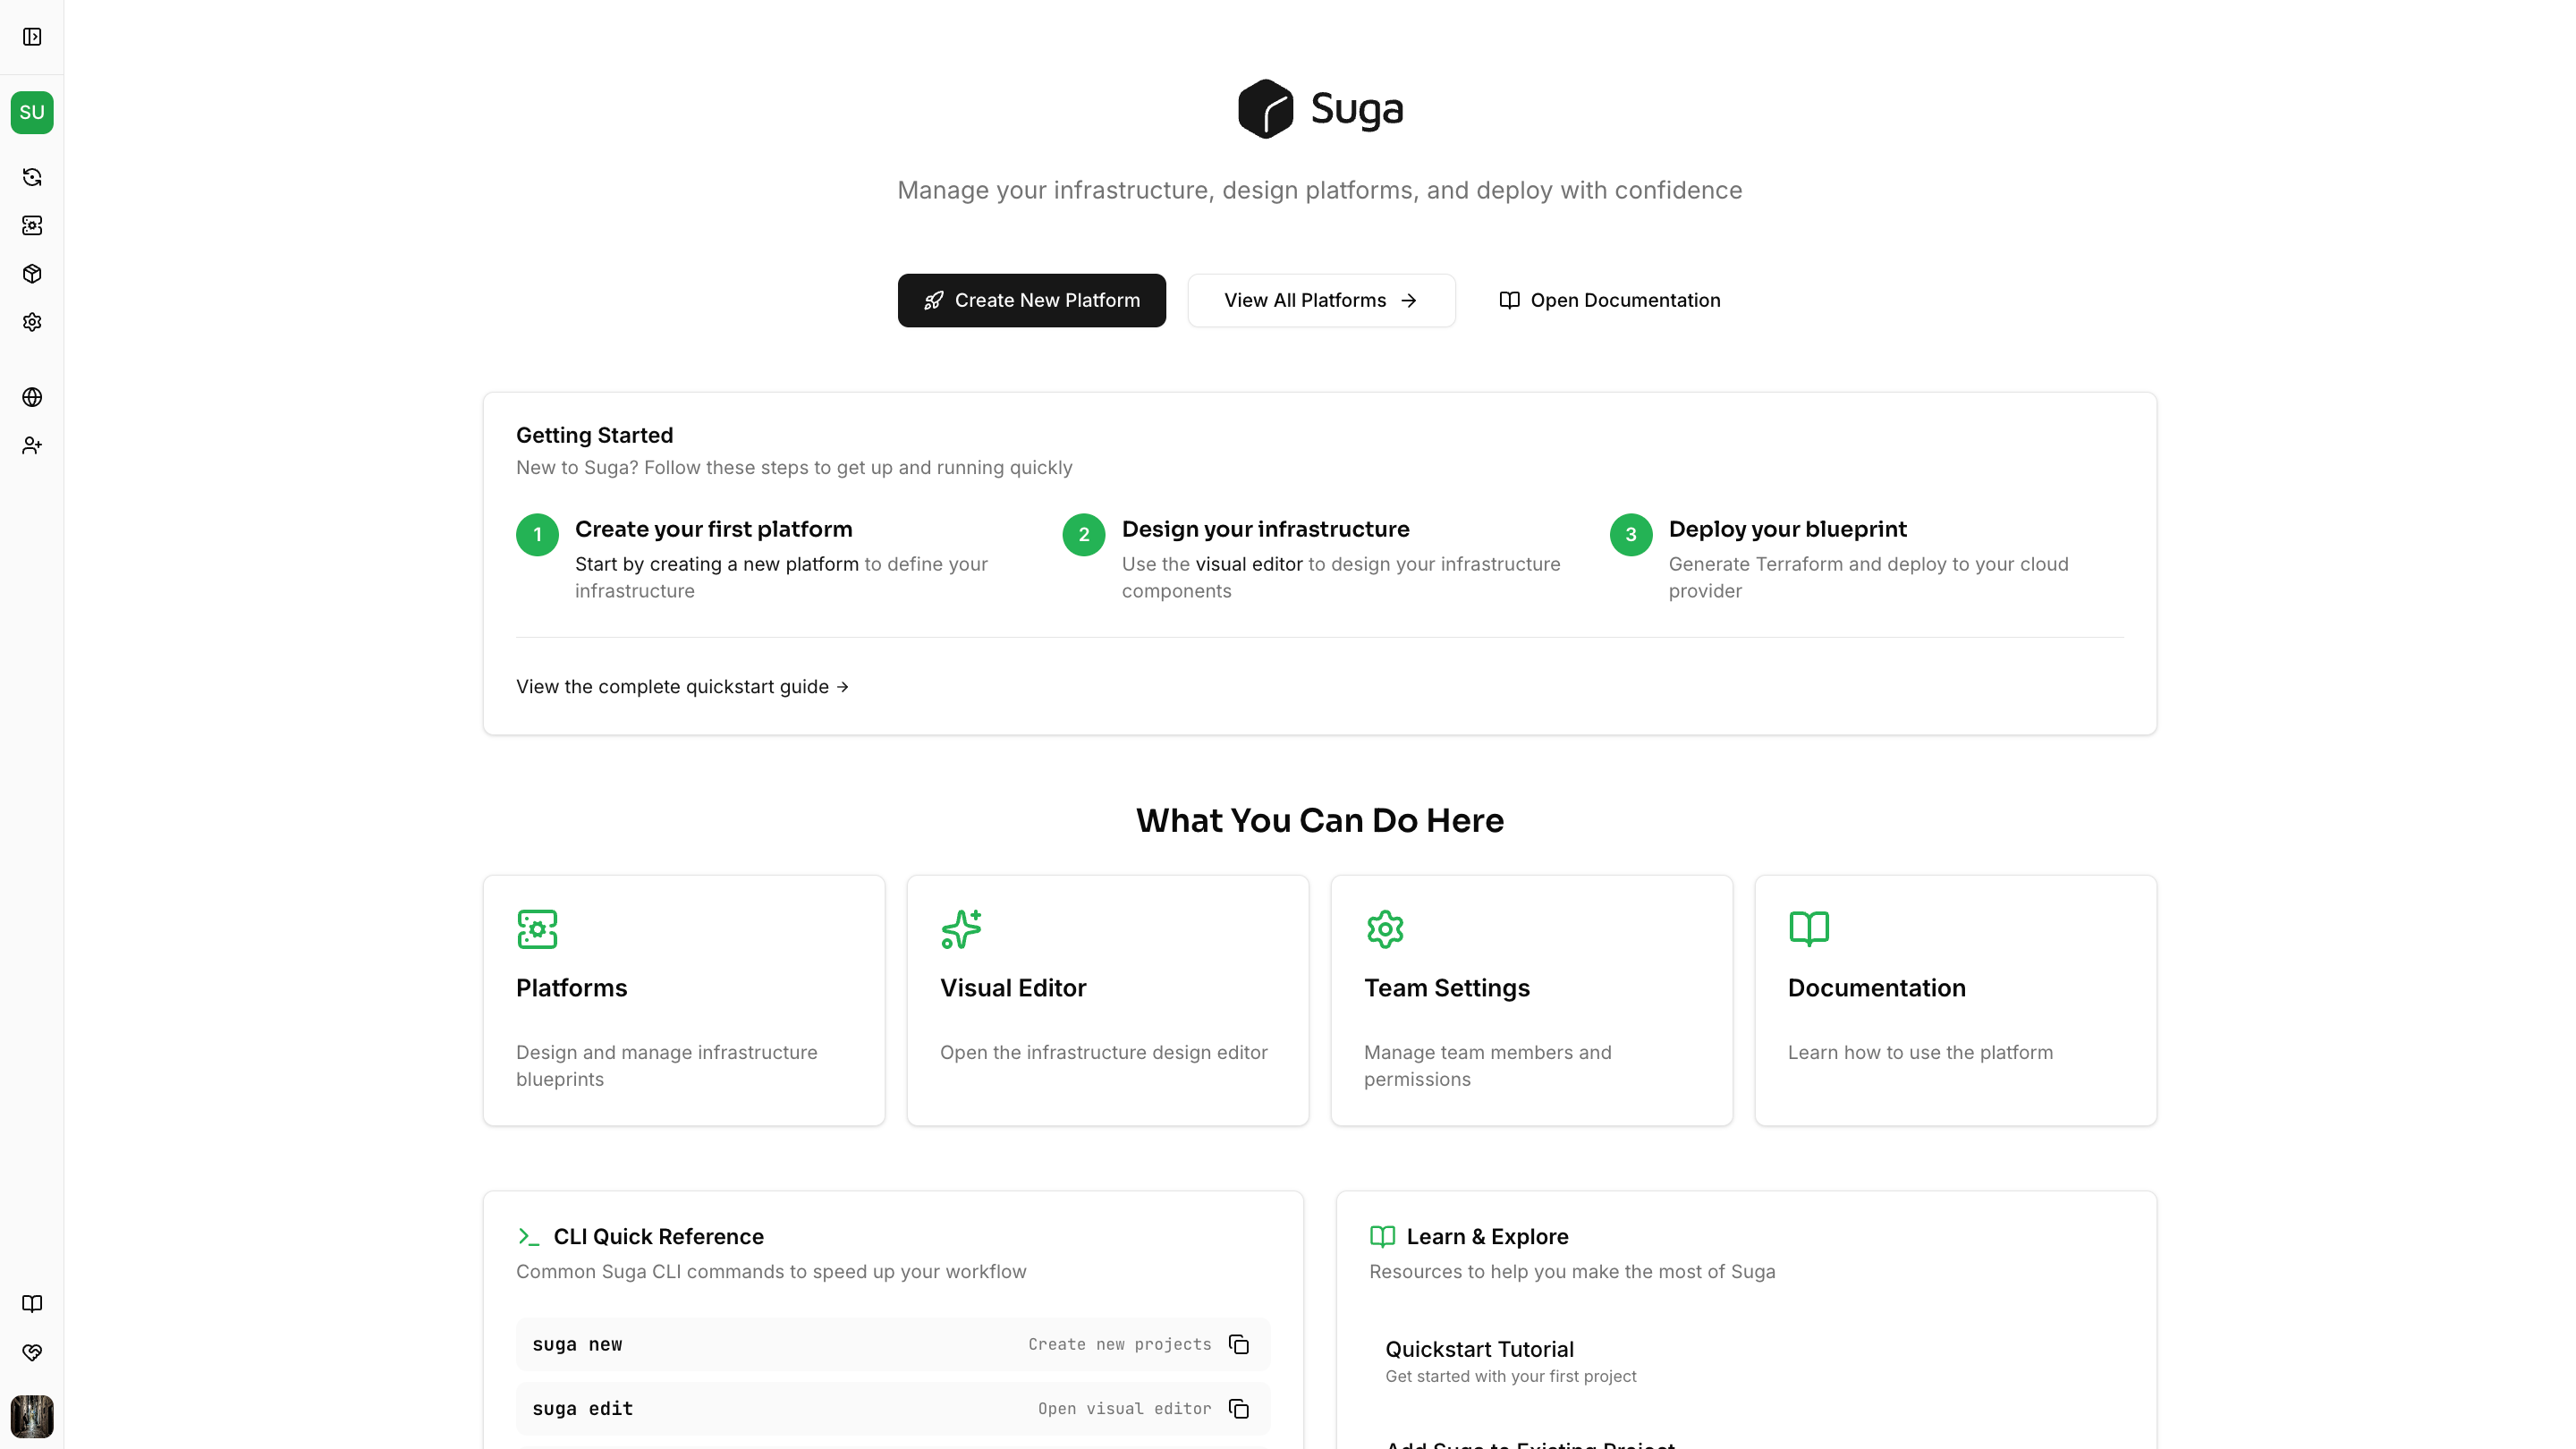
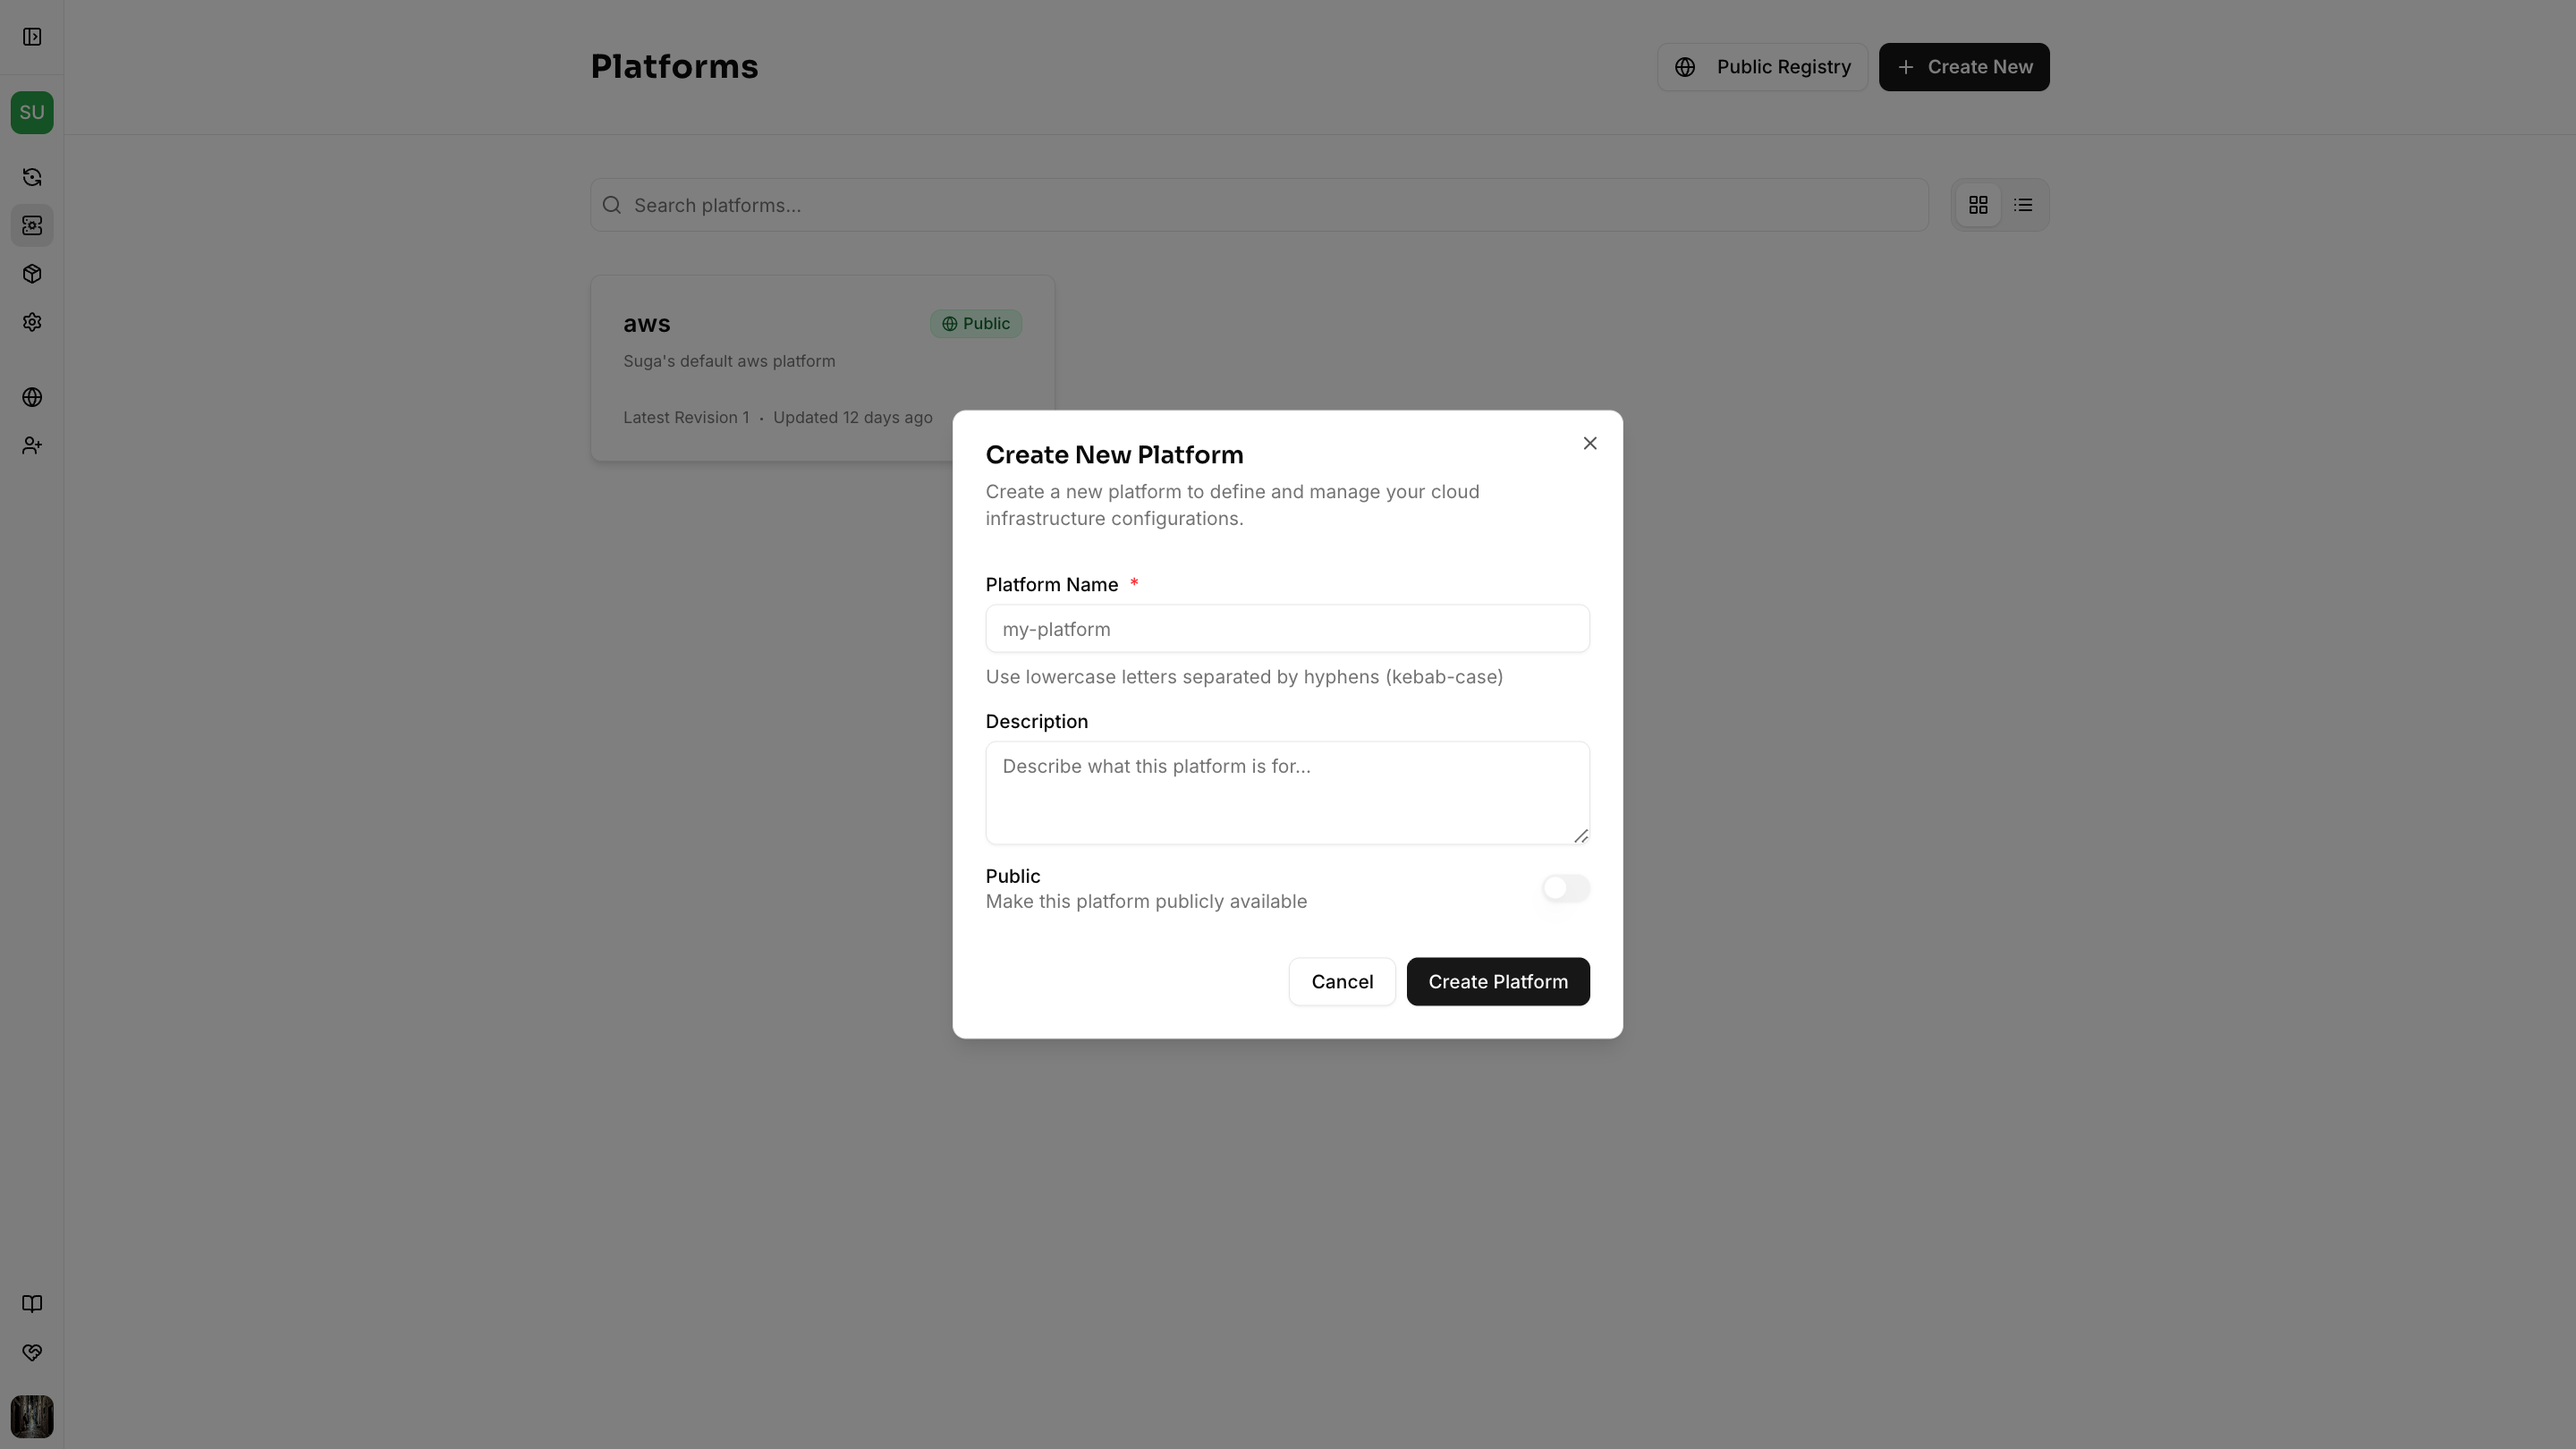
Platforms are owned by teams and shared with team members. Public platforms are visible to all Suga users, while private platforms are only visible to your team.
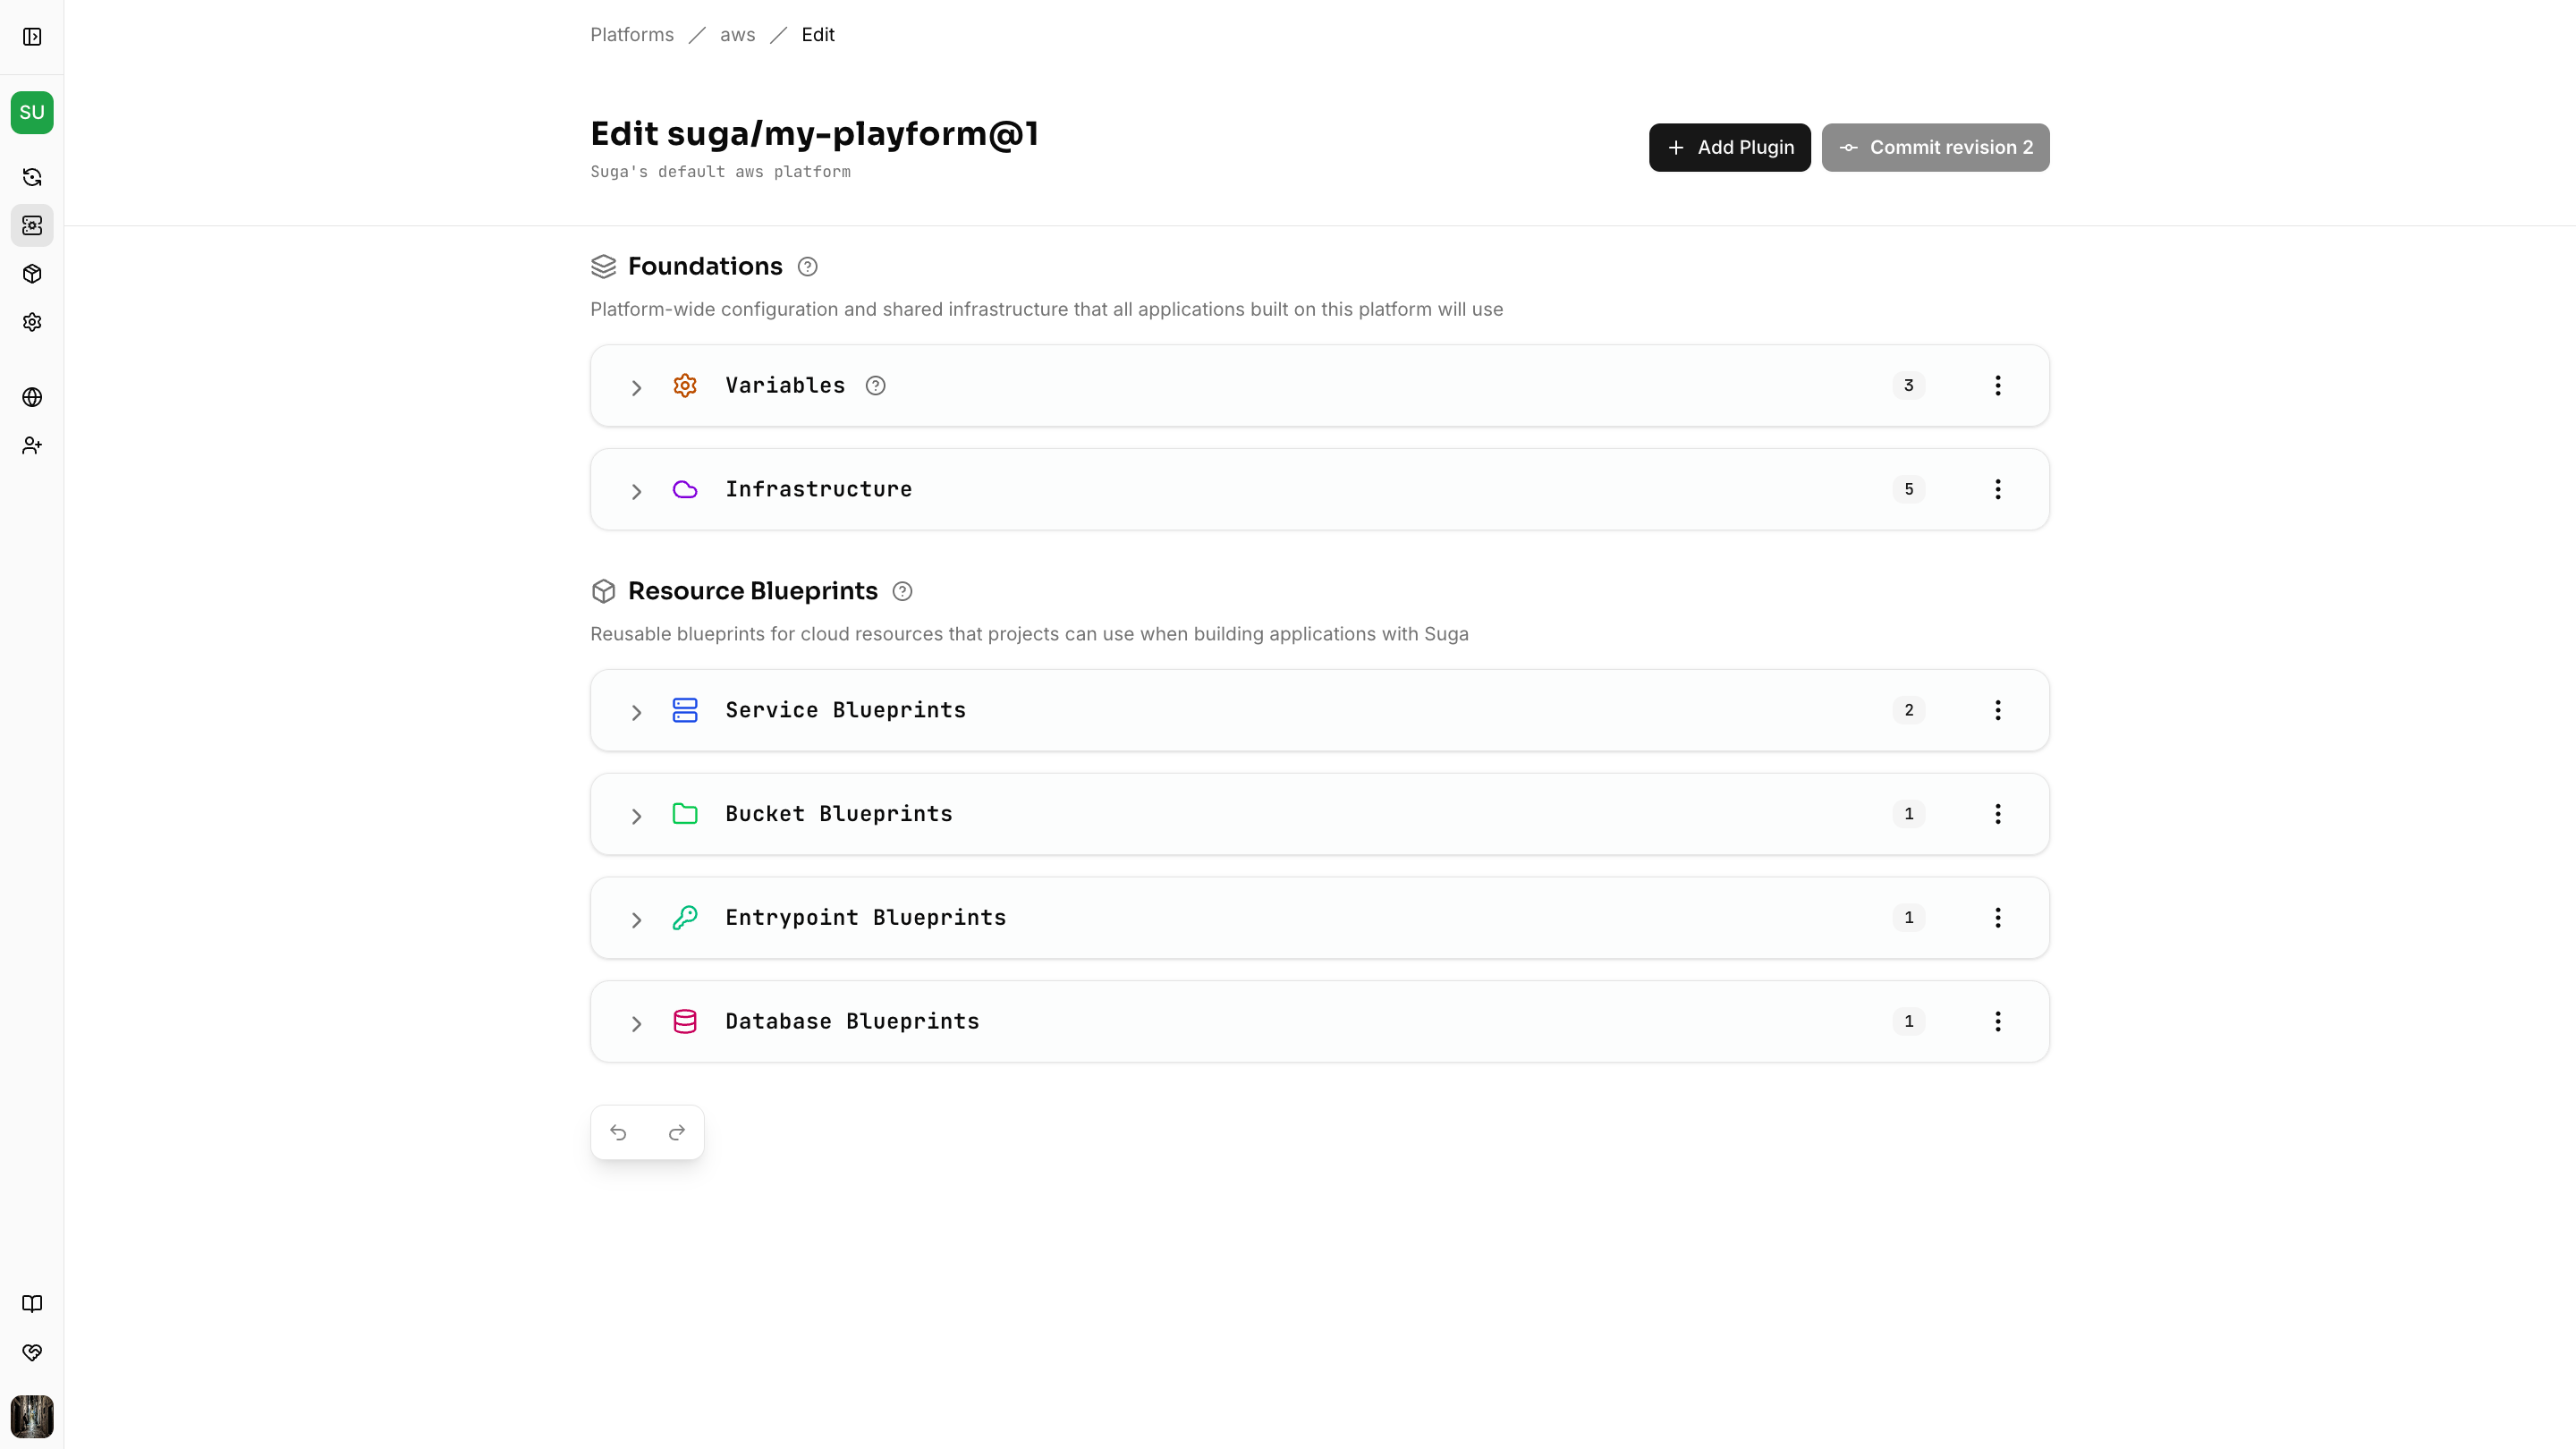
- Core Concepts - Common infrastructure shared by other resources (VPCs, load balancers) and common variables for platform configuration
- Resource Blueprints - Templates that define how to provision application specific resources, such as services, databases, buckets, and entrypoints
Configure Entrypoint Blueprints
This blueprint maps an application’s entrypoints to a CloudFront distribution that routes HTTP traffic to services. Without this, applications would have no way to receive external HTTP requests. Expand Entrypoint Blueprints in Resource Blueprints. Add thecloudfront plugin and apply the following configuration:
Leave blank for default, or use an existing policy ID from AWS console for consistency.
Configure Service Blueprints
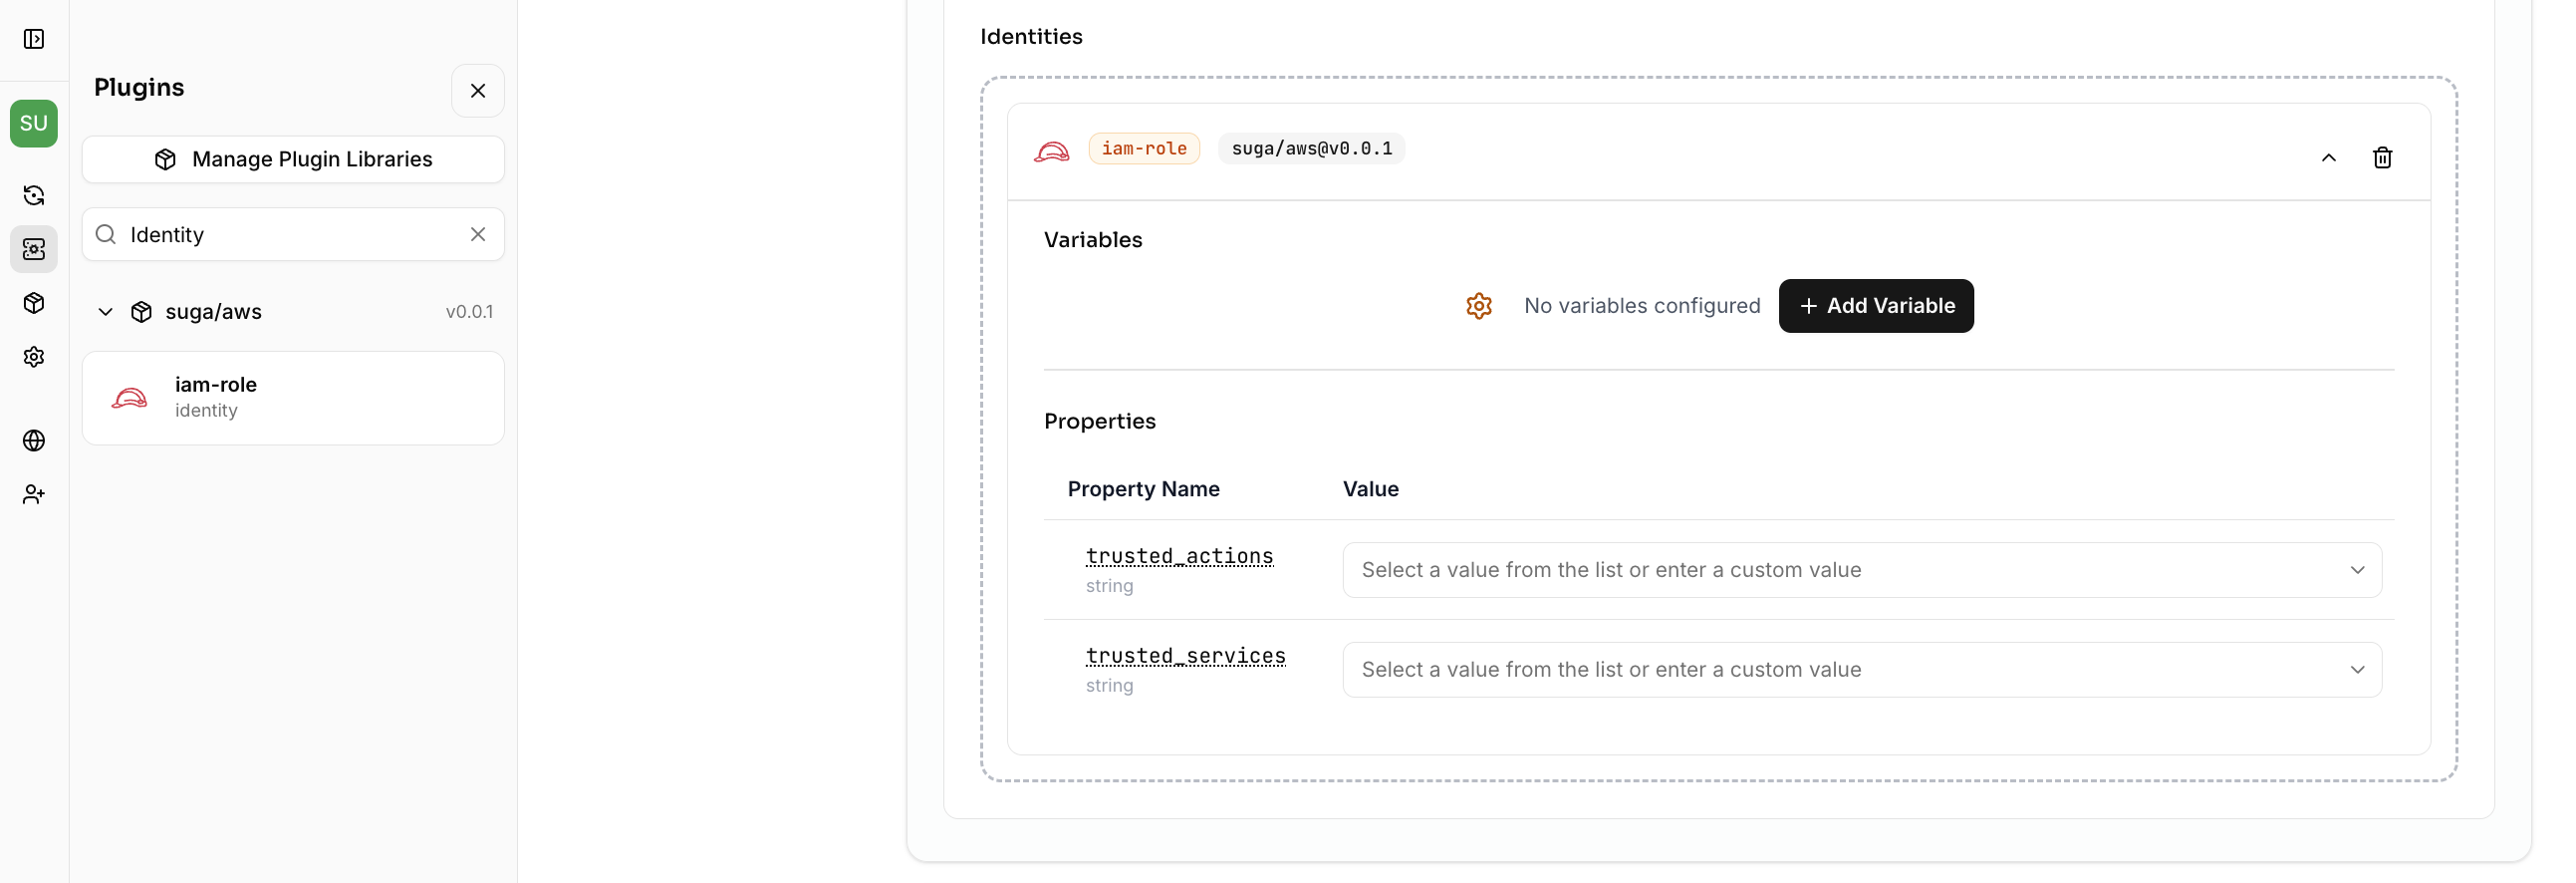
This blueprint maps an application’s services to Lambda functions for serverless execution. This is the compute layer where application code runs. Expand Service Blueprints in Resource Blueprints. Add thelambda plugin and apply the following configuration:
iam-role plugin as the identity to enable automatic IAM permission generation for accessing buckets and databases:
Configure Bucket Blueprints
This blueprint maps an application’s buckets to S3 for object storage with automatic IAM permissions. Applications use buckets to store and retrieve files like images, documents, or user uploads. Expand Bucket Blueprints in Resource Blueprints. Add thes3-bucket plugin and apply the following configuration:
Configure Database Blueprints
This blueprint maps an application’s databases to Neon PostgreSQL with automatic credential injection into services. Applications use databases to persist and query structured data. Expand Database Blueprints in Resource Blueprints. Add platform variable in Core Concepts to specify which Neon project to create databases in:database plugin and apply the following configuration:
Suga uses three types of references in platform configurations:
${var.name}- References platform variables from Core Concepts${self.name}- References resource-specific variables defined in the same resource blueprint${infra.name.output}- References outputs from infrastructure components (you’ll see this in Phase 2)
Applications can optionally set
neon_branch_id for isolated Neon branches (e.g., one per PR).Save Your Platform
Click “Commit Revision” in the platform editor, add a descriptive commit message (e.g., “Initial serverless platform with Lambda, S3, and Neon”), and commit.Each commit creates a new platform revision. Applications reference specific revisions, so you can safely update platforms without breaking existing apps. New applications always use the latest revision.
Test with an Application
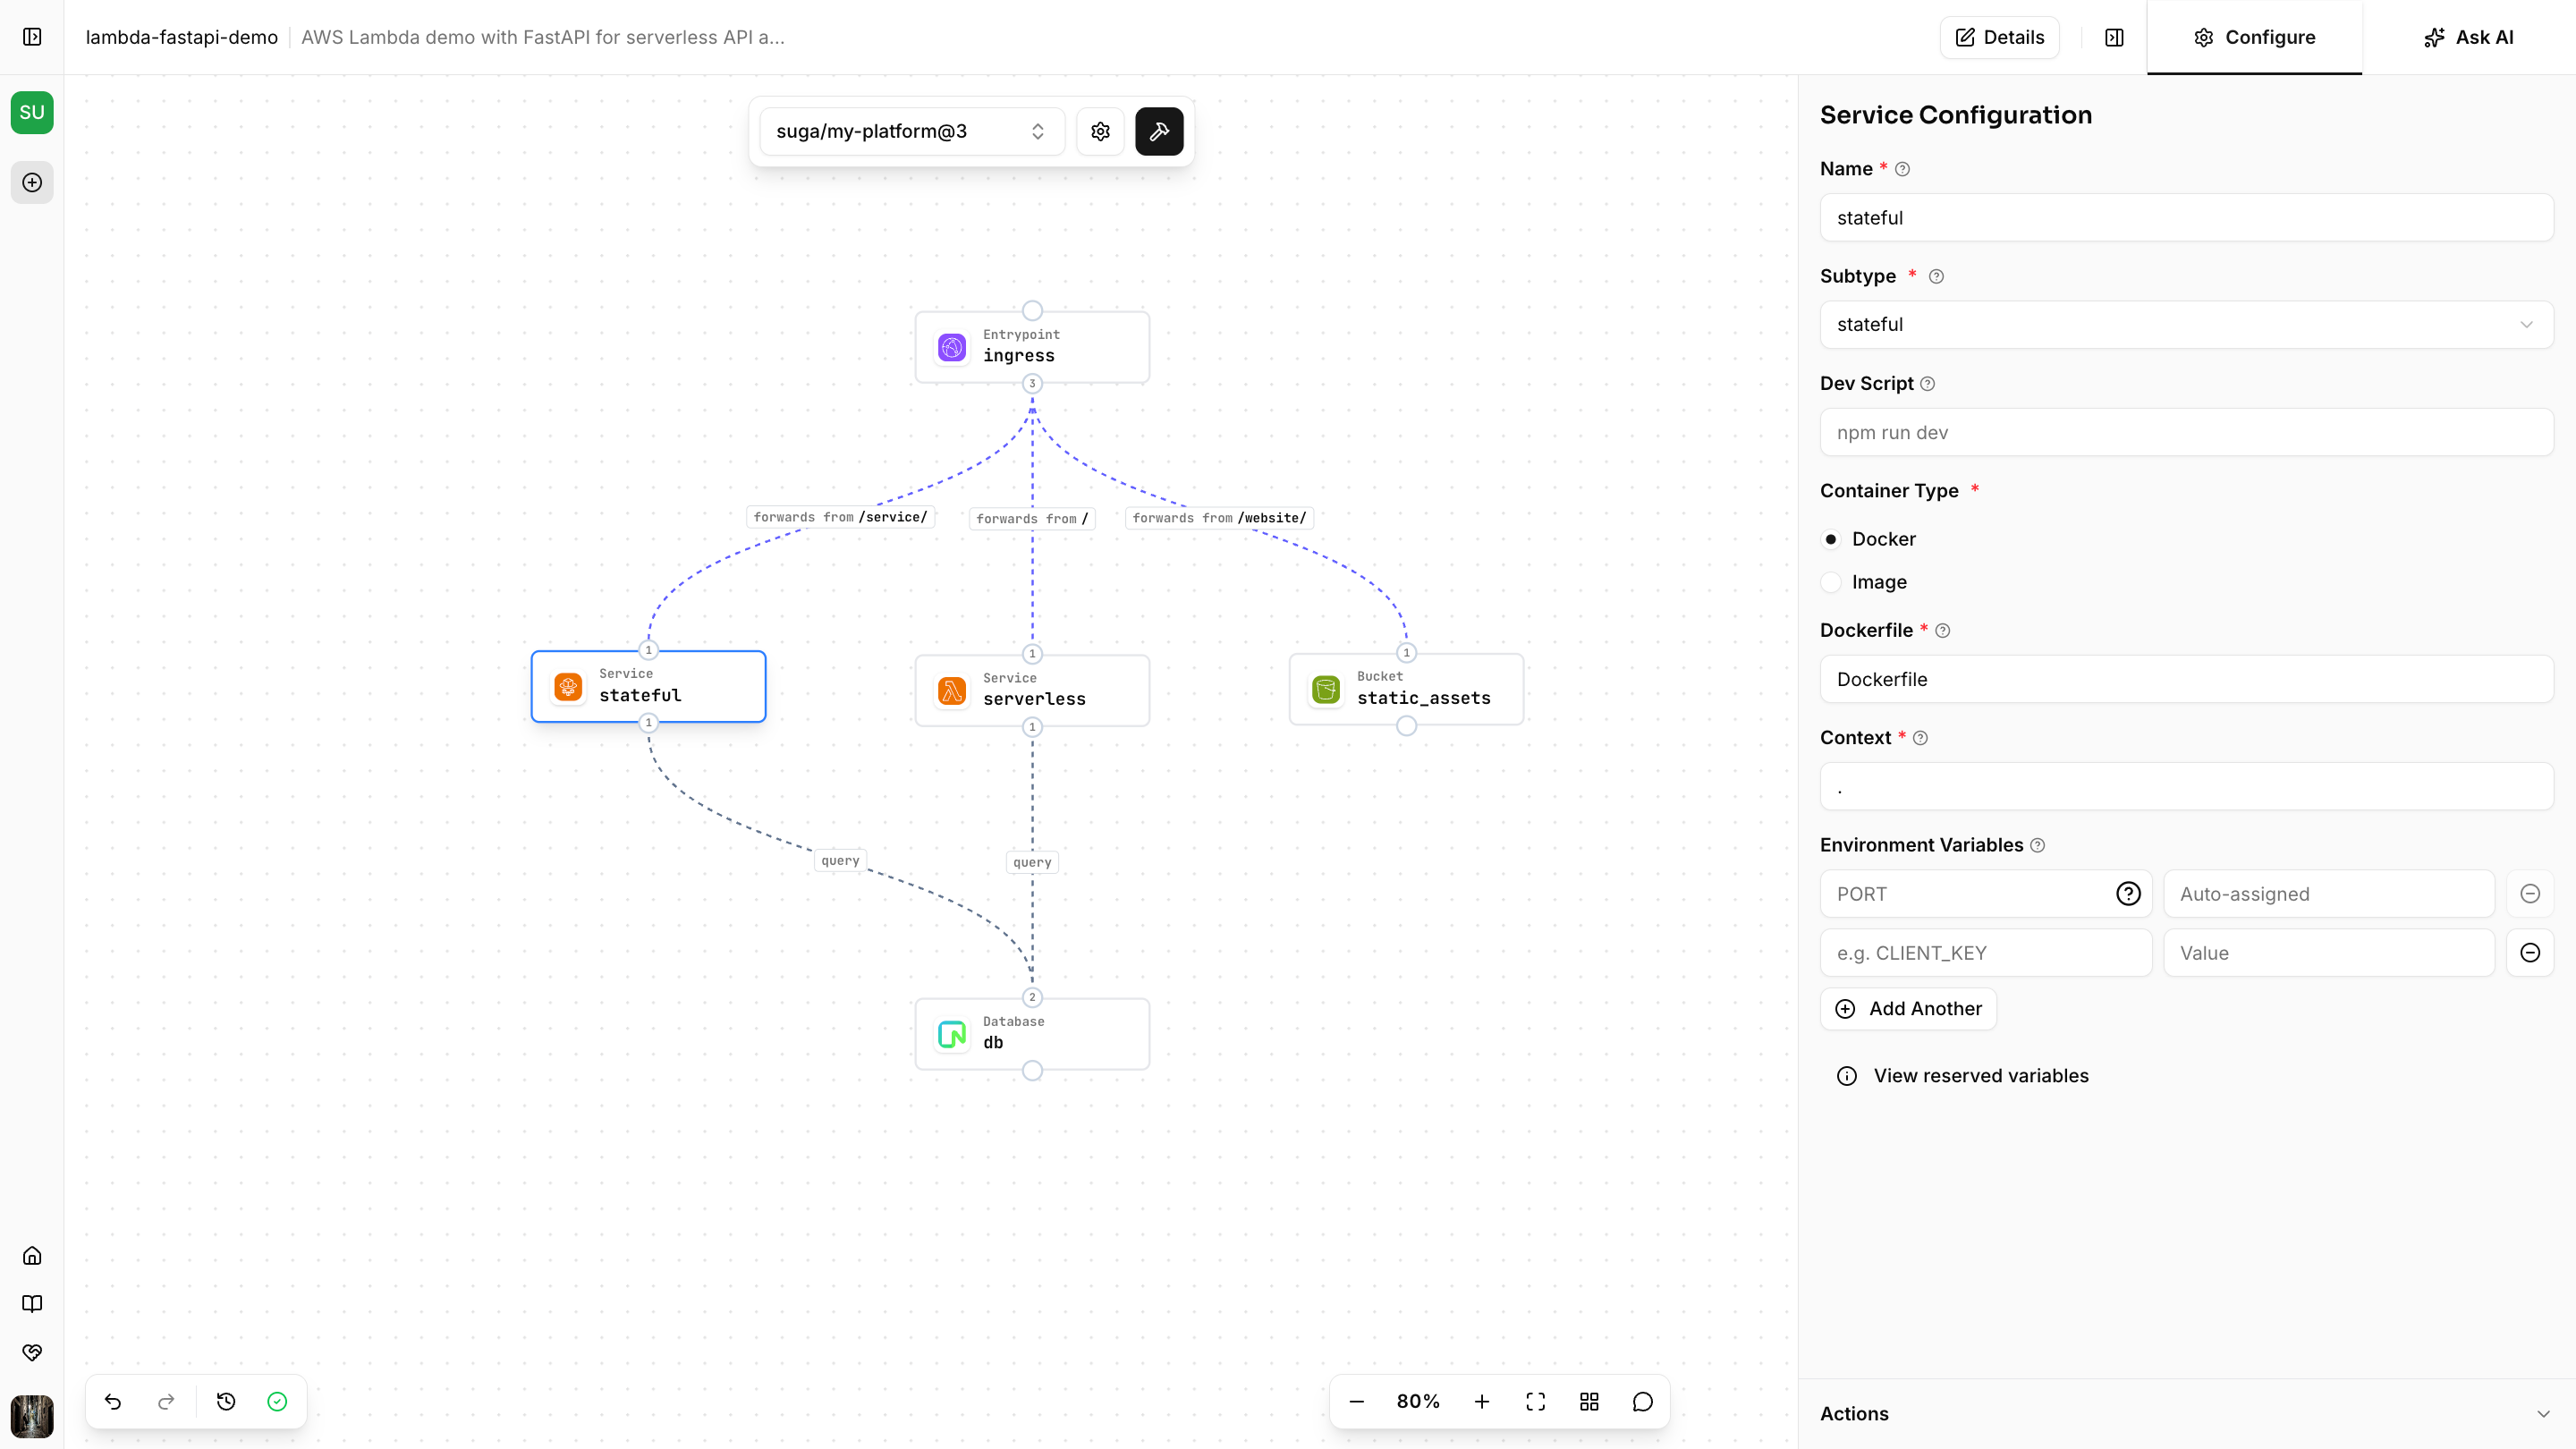
Create an application from the project editor and design your application architecture using the platform you just created. The diagram below shows an example application using this platform. Once you’ve created your application, use the build icon to build your Terraform.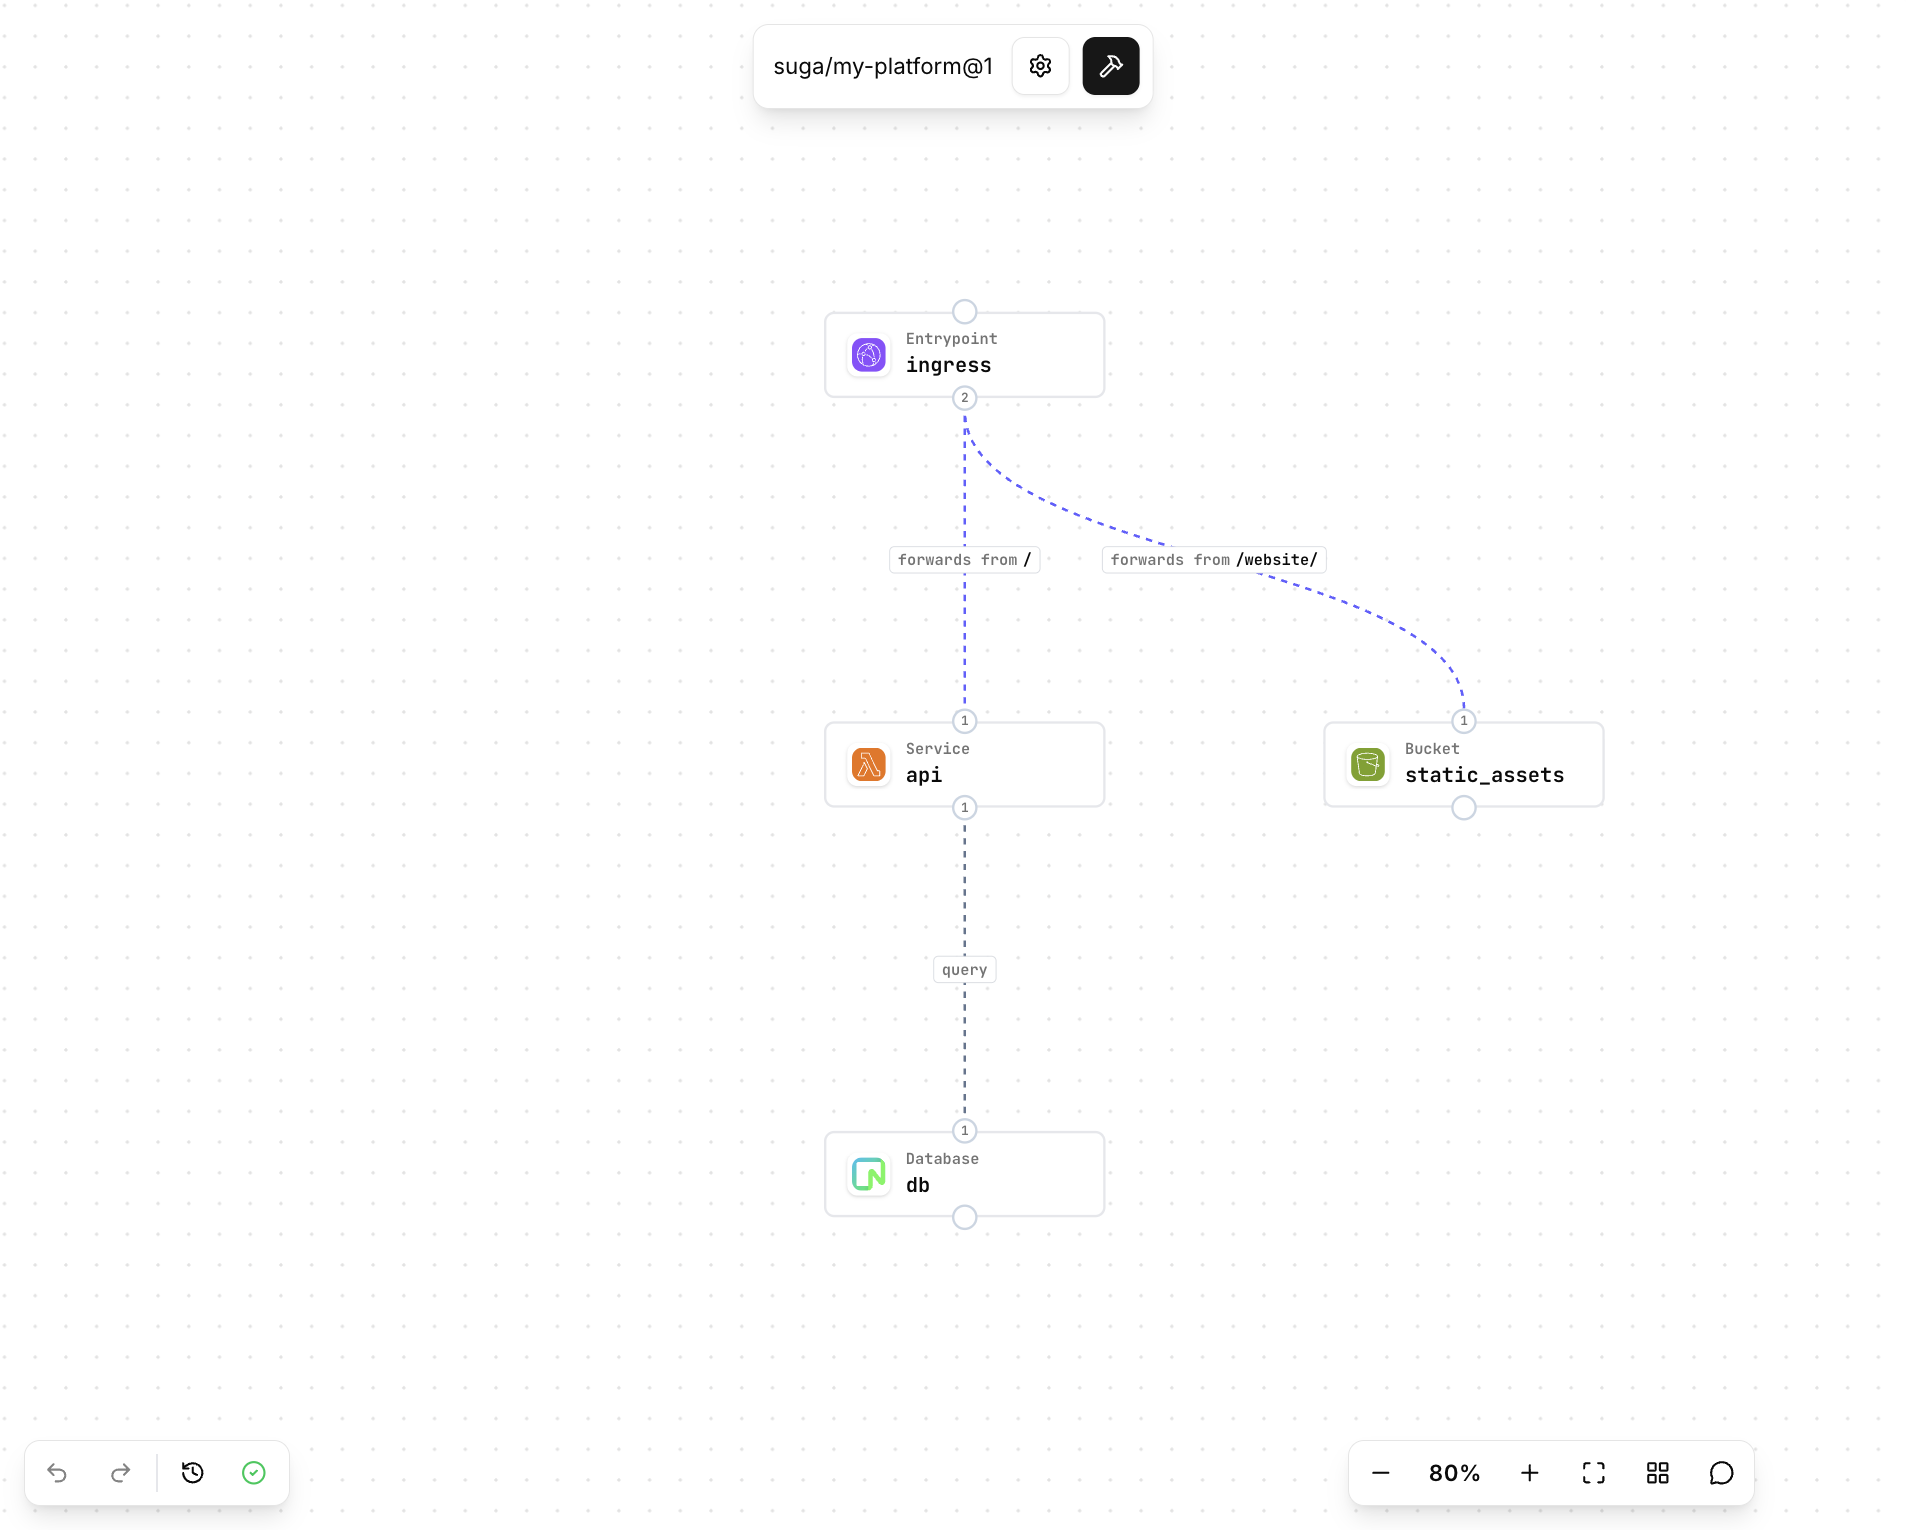
Suga generates Terraform for CloudFront→Lambda routing, IAM policies for declared resources, and database credential injection.
Phase 2: Add Stateful Services
Understanding the Architecture
This architecture shows CloudFront routing to an Application Load Balancer, which distributes traffic to Fargate containers in a VPC. The containers access the same S3 bucket and Neon database.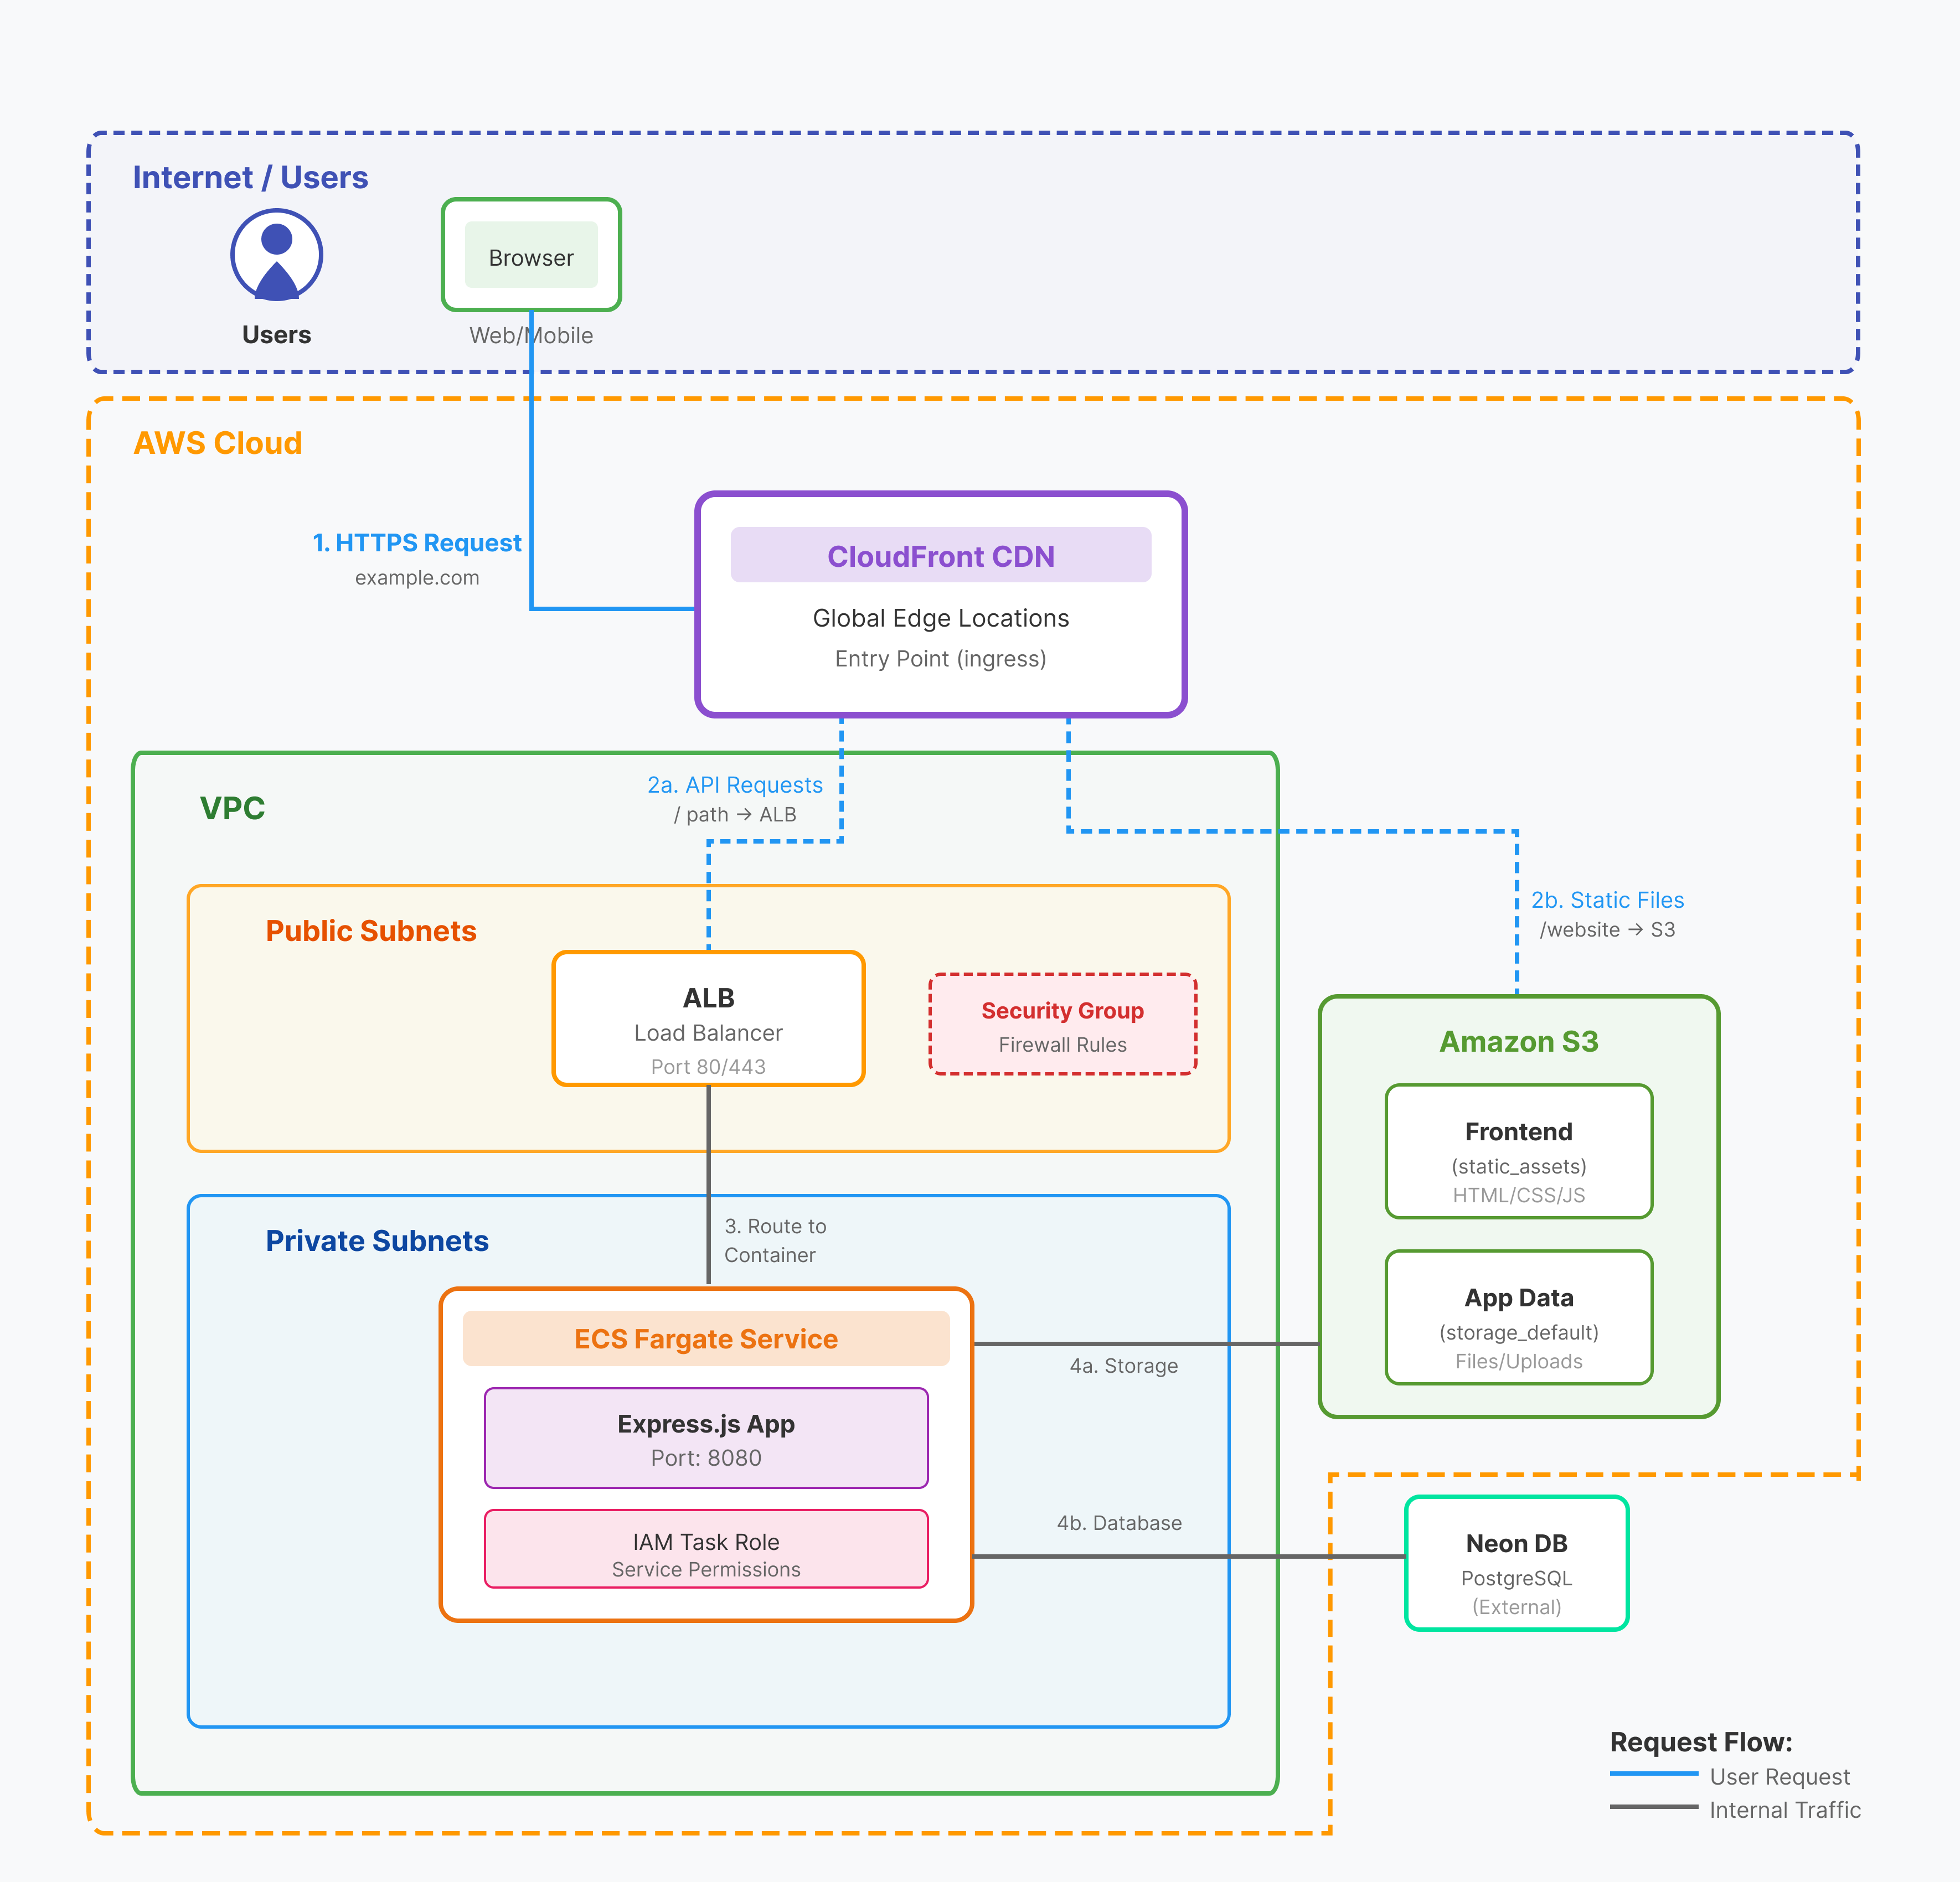
- VPC - Private network for Fargate containers
- Security Group Rules - Firewall rules for container traffic
- Load Balancer - Internal ALB for routing to Fargate containers
- Service - Fargate containers with IAM role as an alternative to Lambda
Applications can declare multiple services—some using
lambda, others using fargate, along with as many buckets and databases as needed.Configure VPC Infrastructure
This shared infrastructure configures the VPC network foundation with isolated subnets, NAT gateways, and routing for stateful containers. Unlike serverless Lambda functions, Fargate containers require a private network to run securely. In the Core Concepts section, expand Infrastructure. Add thevpc plugin and apply the following configuration:
Configure Platform Variables
These platform variables configure the network ports for container communication. Thecontainer_port defines where containers listen for traffic, while lb_listener_port defines where the load balancer accepts incoming requests.
Add platform variables in Core Concepts:
Configure Security Group Rules
This shared infrastructure configures firewall rules for container network traffic: outbound internet access, health check access, and CDN-only ingress. These rules ensure containers can communicate with external services while blocking unauthorized access. In the Core Concepts section, expand Infrastructure. Outbound Internet Access Add thesecurity-group-rule plugin and apply the following configuration:
Dependencies ensure infrastructure is created in the correct order, creating the VPC before this security group rule.
cidr_blocks: ["0.0.0.0/0"] allows outbound traffic to any IP address on the internet.security-group-rule plugin and apply the following configuration:
self: true allows same-security-group communication for load balancer health checks.security-group-rule plugin and apply the following configuration:
prefix_list_names restricts access to CloudFront and prevents direct internet access with DDoS protection.Configure Load Balancer
This shared infrastructure configures an internal Application Load Balancer to route traffic and perform health checks for containers. The load balancer distributes incoming requests across container instances and removes unhealthy containers from rotation. In the Core Concepts section, expand Infrastructure. Add theloadbalancer plugin and apply the following configuration:
Properties like
subnets and security_groups use ${infra.aws_vpc.*} to access outputs from the VPC infrastructure component. This wires the load balancer to the correct network configuration.Configure Service Blueprints
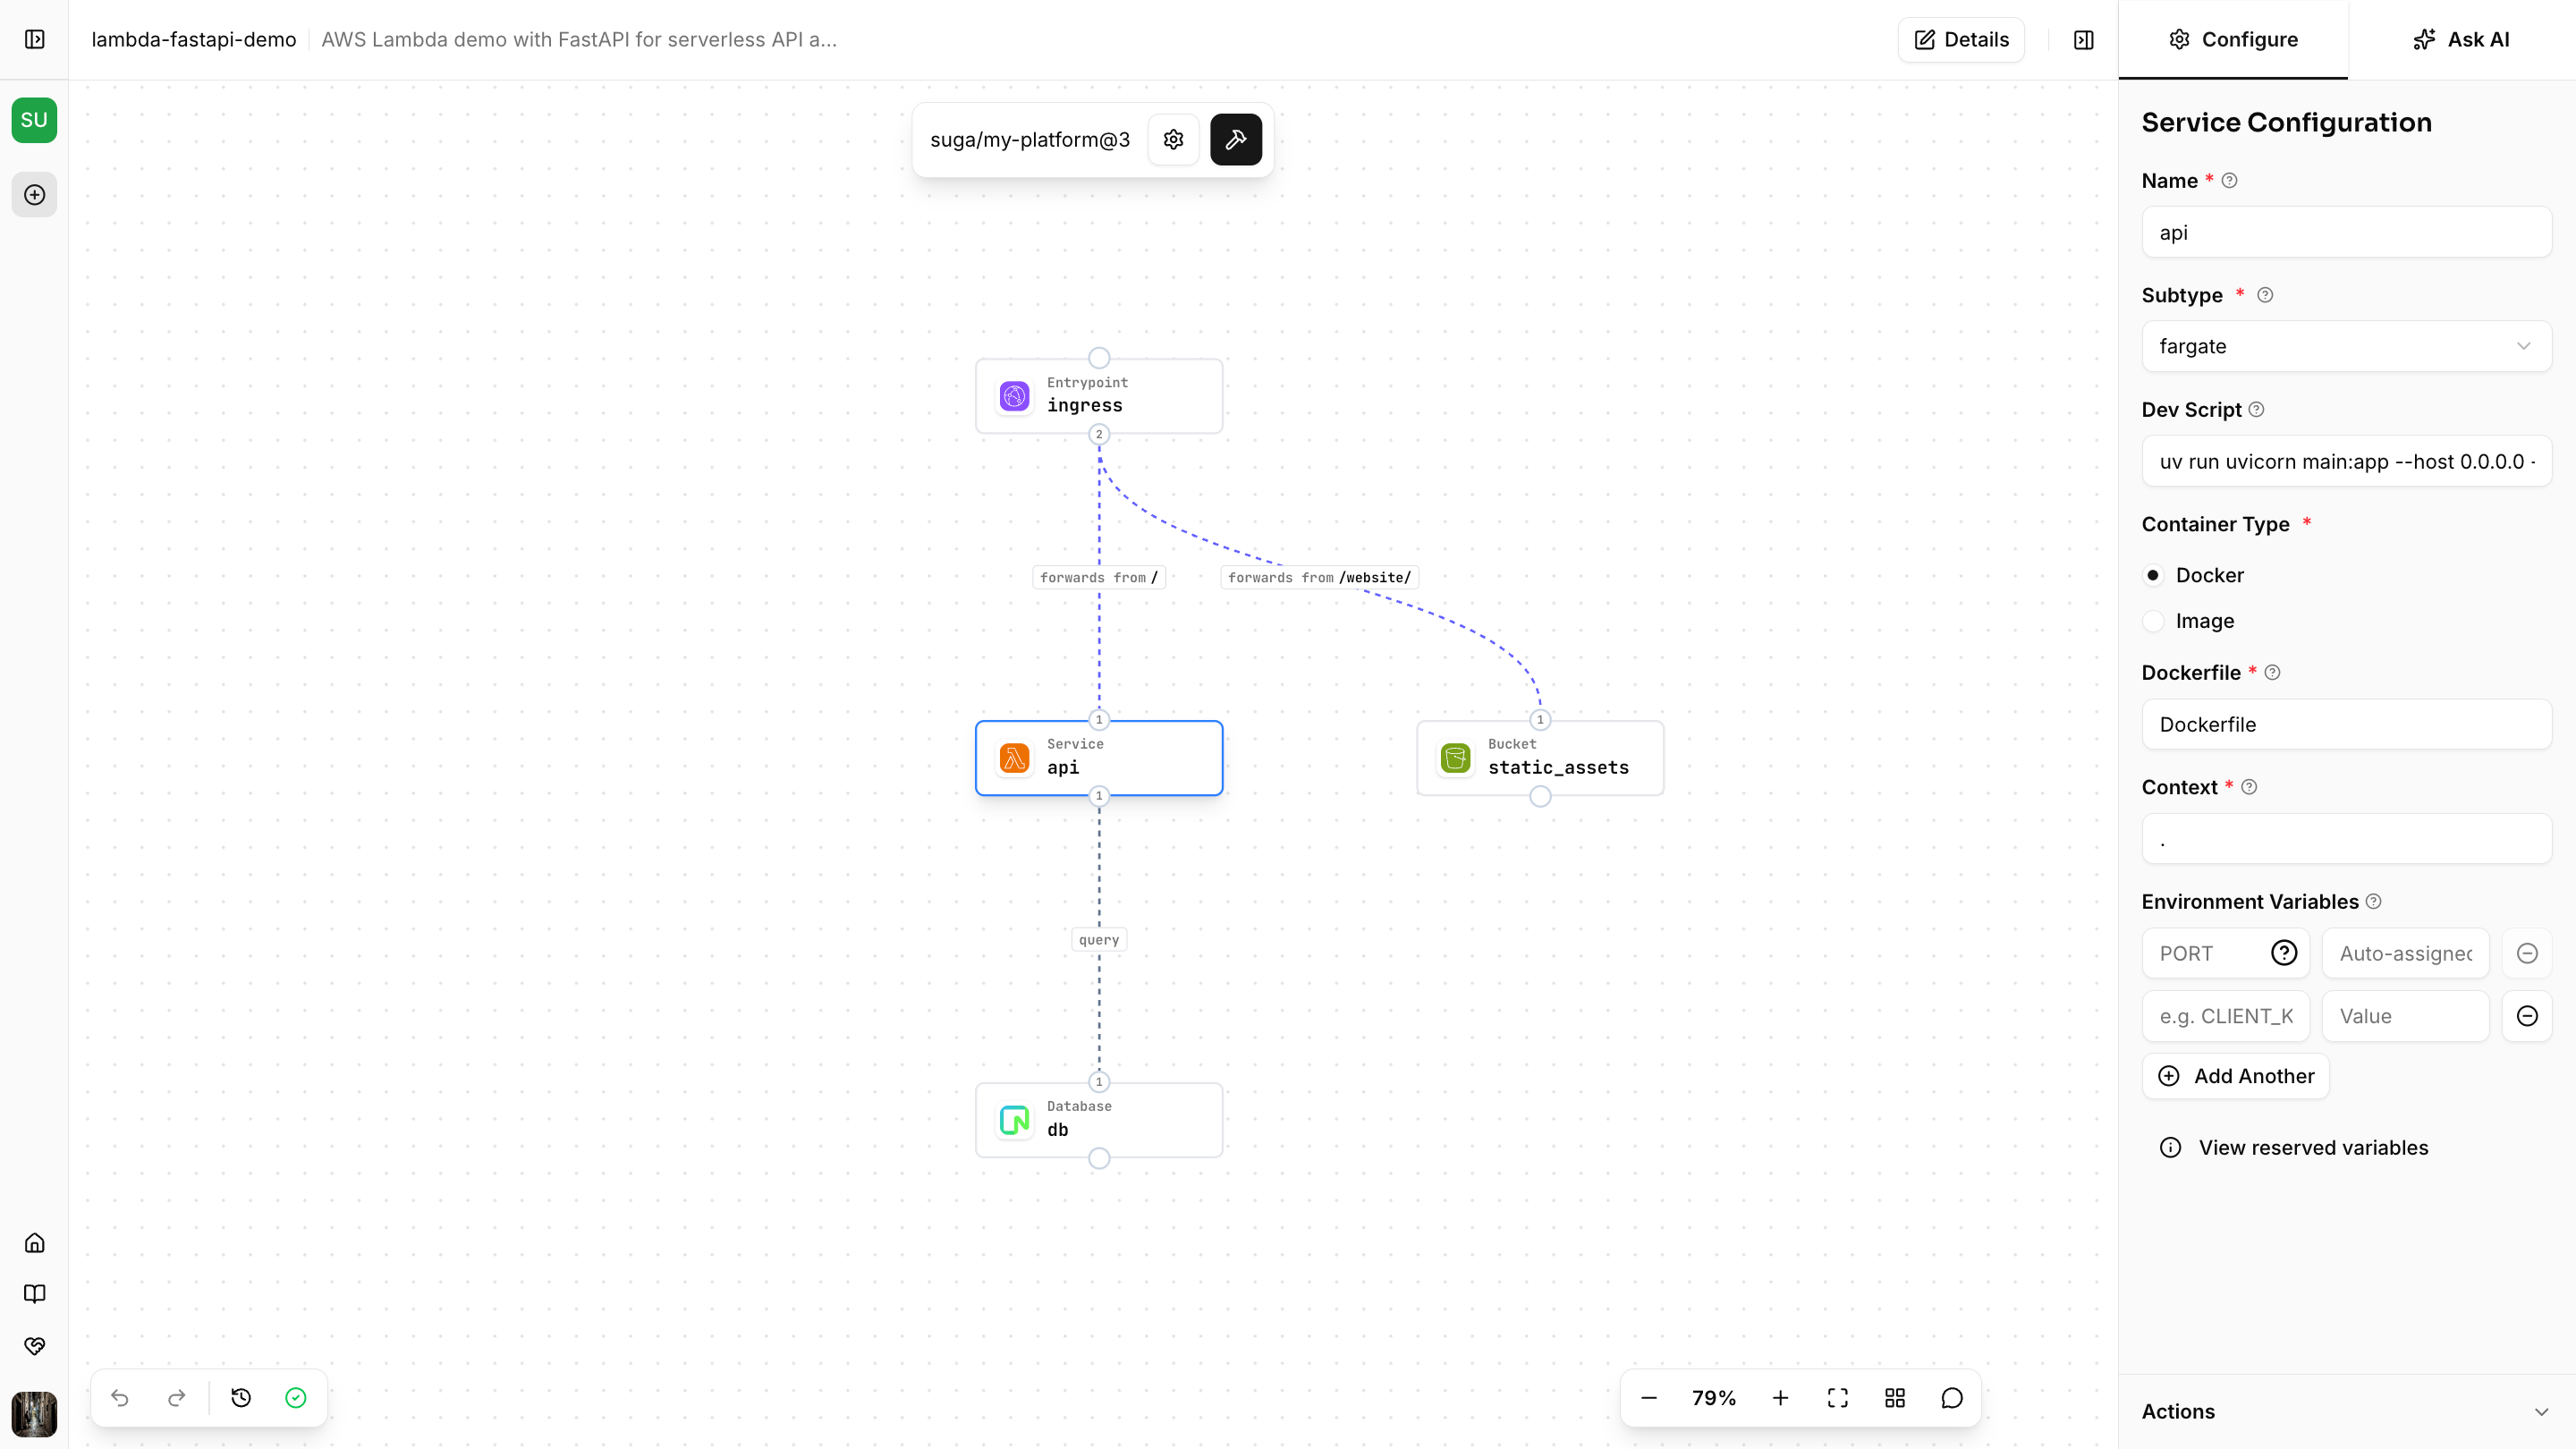
This blueprint maps application services to Fargate containers for stateful workloads, providing an alternative to the Lambda blueprint from Phase 1. Stateful containers support long-running processes, persistent connections, and custom runtimes that aren’t suitable for serverless functions. Expand Service Blueprints in Resource Blueprints. Add thefargate plugin and apply the following configuration:
The plugin name becomes the subtype dropdown option in the application editor. Use descriptive names when adding multiple service plugins.
iam-role plugin as the identity to enable automatic IAM permission generation for accessing buckets and databases:
These properties wire Fargate containers into the VPC network and register them with the load balancer for traffic routing and health checks.
Test Complete Platform
Your platform now supports both architectures! Applications select blueprints using the subtype dropdown (fargate or lambda).
Troubleshooting
Infrastructure reference errors If you see errors about missing infrastructure references:- Verify plugin names match exactly (e.g.,
${infra.aws_vpc}requires a plugin namedaws_vpc) - Check that dependencies are declared before using outputs
- Ensure infrastructure components are in the Core Concepts section, not Resource Blueprints
- Check that all required properties are filled in
- Verify variable references use the correct syntax (
${var.name}, not$var.name) - Look for typos in plugin names or property names
- Verify the platform revision is committed and saved
- Check that blueprint names are unique within each category
- Ensure all
${infra.*}references point to existing infrastructure outputs
Next Steps
- Test with a real application: Create an application using this platform, build the Terraform, and deploy to AWS to verify everything works end-to-end
- Share with your team: Make the platform available to your team so they can start building applications
- Create environment variants: Duplicate your platform with environment-specific variables (e.g., smaller instances for dev, larger for prod)