The Suga CLI provides everything you need to build cloud applications with automatic infrastructure generation for many cloud providers.
Prerequisites: This guide assumes you have the Suga CLI installed. If you need to install it, see the Installation Guide for platform-specific instructions.

Sign In to Suga

Sign in to the Suga platform:
Sign In to Suga
suga login
If you don’t have a Suga account yet you can request access at addsuga.com
You’ll see a confirmation:
 Suga Logging in...

 Logged in as User
During early access authentication is required to access all Suga platform features. In the future, certain features may be made available without signing in.

Create Your Project

Create a new project from a template:
Create New Project
suga new my-first-app
Select any template you prefer:
You’re welcome to use frameworks or tools beyond what’s listed in the Templates, consider them a starting point or example.
Welcome to Suga, this command will help you create a project from a template.
If you already have a project, run suga init instead.

Project name: my-first-app
Template:
 suga/go-standard
  suga/python-django-pip
  suga/python-fastapi-uv
  suga/typescript-express

Template: suga/go-standard

 Project created!

Design Your Application

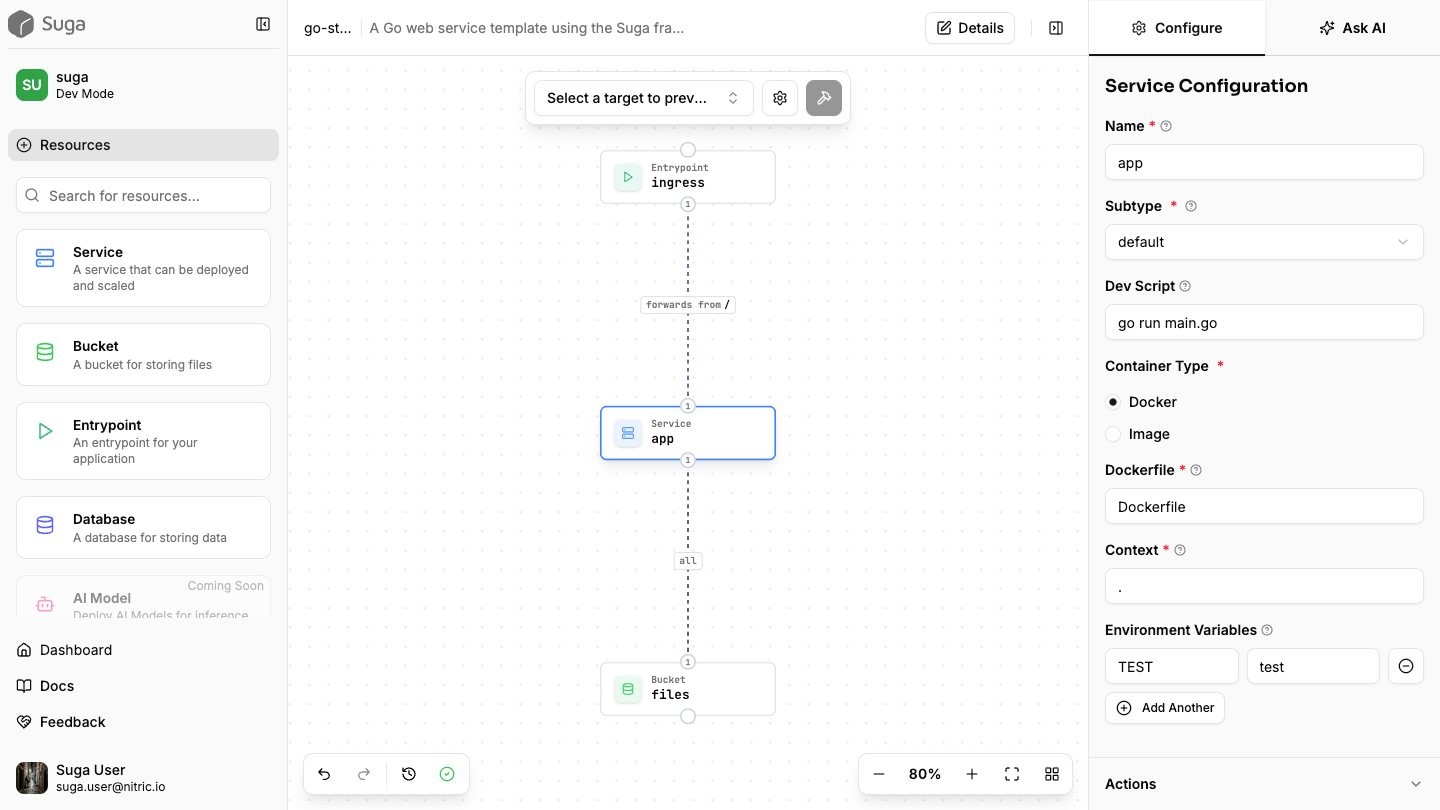
Now, let’s start by looking at Suga’s visual project editor, to get familiar with what Suga can do:
Open Visual Editor
suga edit
The editor launches in your browser:
 Suga 1.0.0
- Sync Port: 50127
- Dashboard: https://app.addsuga.com/your-team/dev?port=50127 

Opening browser to the editor
Use Ctrl-C to exit
Use the visual editor to design your APIs, databases, storage, and other cloud resources with drag-and-drop simplicity. Architecture Design
The editor automatically updates your suga.yaml file as you make changes.
Let’s review what the go-standard template has defined in the suga.yaml:
suga.yaml
target: suga/aws@1
name: my-first-app
description: A Go web service template using the Suga framework for cloud resource access.

services:
  app:
    subtype: lambda
    env:
      TEST: test
    container:
      docker:
        dockerfile: Dockerfile
        context: .
    dev:
      script: go run main.go

buckets:
  files:
    subtype: s3
    access:
      app:
        - all

entrypoints:
  ingress:
    subtype: cloudfront
    routes:
      /:
        name: app
The template includes:
  • target: AWS deployment configuration
  • services: Your app service with local dev script and Docker container setup
  • buckets: A files bucket that your app can read from and write to
  • entrypoints: An HTTP endpoint that routes traffic to your app

Local development

When you’re ready to edit the code, start by installing the application’s dependencies. Projects can also optionally use a cloud resource client generated by Suga (for accessing resources like Buckets).
Navigate to Project
cd my-first-app
  • Node.js
  • Python
  • Go
Install Dependencies (node)
# Install dependencies
npm install

# Run the Suga client generation (if used in the template)
npm run generate
Your project structure will include suga.yaml for configuration, service code, and language-specific dependencies.
The Suga CLI ships with a local development server that helps emulate cloud resources like Buckets and Entrypoints, as well as running and reloading your application code for services. Use the suga dev command to start the local development server:
Start Development Server
suga dev
Your application starts with hot reload:
 Suga 1.0.0
- App: my-first-app
- Addr: :50051

Services

 Starting [app]

Entrypoints

 Starting [ingress] http://localhost:3000

Use Ctrl-C to exit
Test your application:
Write to Storage
curl -X POST http://localhost:3000/write/test.txt \
  -H "Content-Type: text/plain" \
  -d "Hello from Suga!"
Expected response:
File 'test.txt' written to bucket.
Read from Storage
curl http://localhost:3000/read/test.txt
Expected response:
Hello from Suga!
Services automatically restart when you update your code, providing instant feedback during development.
You can see and modify the contents of certain resources like buckets by accessing the .suga temporary directory, which is added to your project by the dev command. For example, the objects written to the files bucket will be available in .suga/buckets/files/. This makes seeding your local bucket with files for testing easier, as well as viewing any files created at runtime by your application code.

Deploy to the Cloud

Configure your deployment target in the visual editor or set it in suga.yaml:
suga.yaml
target: suga/aws@1
The template has been set up to use AWS. You can also use suga/gcp@1 for GCP. These targets are officially supported.
With a target selected, Suga can use that platform target to automatically generate a Terraform Stack that will deploy your application, including application code, resources like entrypoints, databases and buckets as well as the IAM/Permissions needed to securely access those resources. Run the build command to generate the Terraform:
Build Application
suga build
You’ll see the build output as a terraform stack with everything needed to deploy your application to the cloud:
 Terraform generated successfully
  output written to terraform/stacks/my-first-app

Next steps:
1. Run cd terraform/stacks/my-first-app to move to the stack directory
2. Initialize the stack terraform init -upgrade
3. Optionally, preview with terraform plan
4. Deploy with terraform apply

Configuring cloud provider credentials

In order for Terraform to be able to complete the deployment, it will need credentials to access your chosen cloud provider. There are many ways to achieve this, we’ll start with a basic option here, but feel free to use your preferred method.
  • AWS
  • GCP
Configure AWS
aws configure

Deploy with Terraform

Navigate to the output location of the generated Terraform Stack:
Navigate to Stack
cd terraform/stacks/my-first-app
Initialize the stack, including downloading the Terraform modules provided by your platform target of choice:
Initialize Terraform
terraform init -upgrade
Depending on the Suga target you selected before building the stack, certain additional steps may be required to fully configure the Terraform stack, before it can be deployed. For the platforms provided by Suga out-of-the-box, we try to keep this step to a minimum. Here are the steps for AWS and GCP:
  • suga/aws
  • suga/gcp
Suga’s AWS platform generates Terraform that uses the standard AWS Terraform Provider. At minimum, you’ll need to configure the provider to deploy to your preferred AWS region.In the Terraform output directory for your stack (e.g. ./terraform/stacks/my-first-app), create a new file called provider.tf. In the file, add the provider configuration (region at minimum):
provider.tf
provider "aws" {
  region     = "us-east-1"
}
Files like provider.tf and terraform.tfvars will not be overwritten or removed the next time you run suga build, so this step should only be required for the first deployment.
Optionally, preview the deployment changes:
It’s worth reviewing the Terraform plan carefully before applying to understand what resources will be created in your cloud account.
Preview Changes
terraform plan
Deploy the stack:
Deploy Application
terraform apply
Confirm when prompted:
Do you want to perform these actions?
  Terraform will perform the actions described above.
  Only 'yes' will be accepted to approve.

  Enter a value: yes

Apply complete! Resources: 15 added, 0 changed, 0 destroyed.

Outputs:
api_endpoint = "https://api.my-first-app.example.com"
If you make changes to your application in the future, you can re-run suga build to update the Terraform with the latest changes and redeploy as needed.
Remember to run terraform destroy if you no longer want your application to be deployed, to avoid unexpected cloud costs.

Next Steps

Now that you know how to use Suga to develop and deploy cloud applications, consider some of these docs to continue learning about Suga:
Need help? Contact support@addsuga.com or check our GitHub.